Want to build stronger, rounder glutes without spending hours at the gym?
Here’s the deal: A study found that resistance training with elastic devices provides similar strength gains to resistance training performed with conventional devices.
And the best part? You can do these exercises anywhere.
After looking at 50+ resistance band workouts and talking to certified fitness trainer, I’ve found that these 10 exercises always work best for glute development.
The secret? It’s all about “time under tension,” a proven scientific principle that makes resistance bands incredibly effective for building and toning glutes.
In this guide, you’ll learn:
- The exact resistance band exercises that target all three gluteal muscles
- Step-by-step form instructions (with common mistakes to avoid)
Let’s dive in.
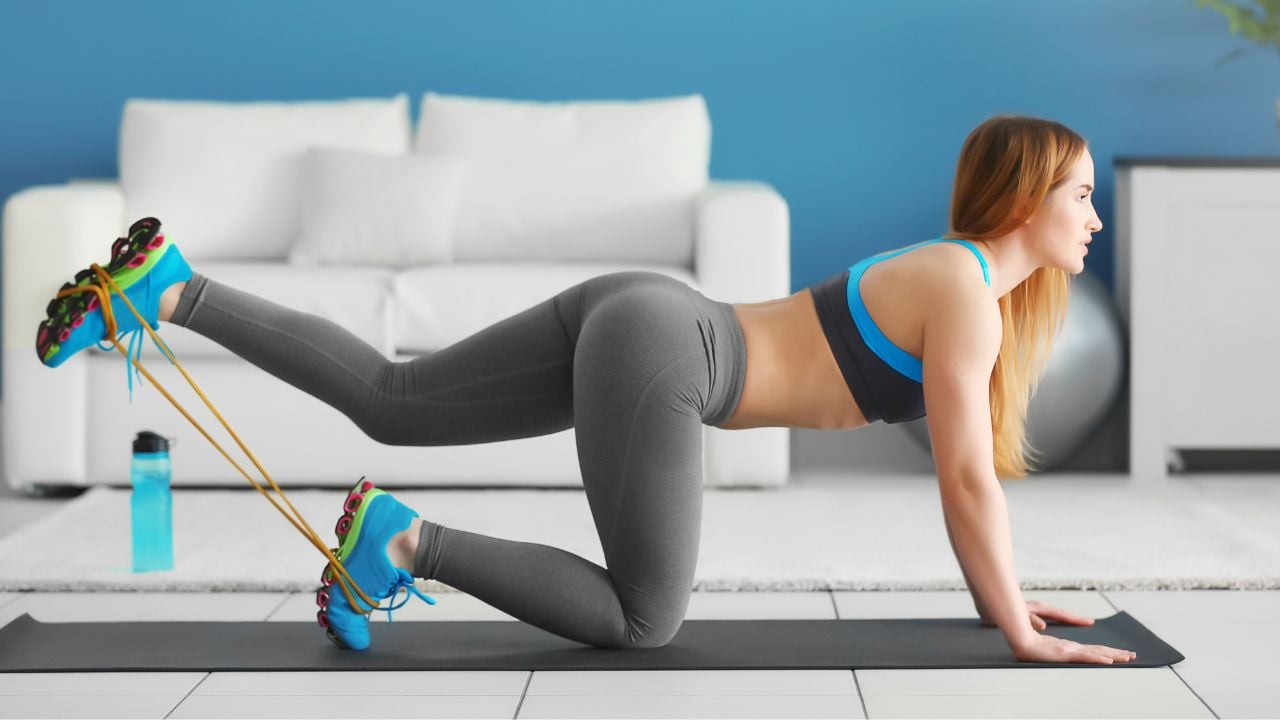
- 10 Best Glute Exercises With Resistance Band
- 1. Band Side-Lying Leg Lift
- 2. Resistance Band Glute Bridge
- 3. Band Clamshell
- 4. Band Donkey Kick
- 5. Banded Pull-Throughs
- 6. Kneeling Hip Thrust
- 7. Lateral Band Walks
- 8. Resistance Band Squat
- 9. Standing Band Hip Abduction
- 10. Band Fire Hydrants
- Beginner Resistance Band Glute Workout Plan
- Conclusion
- References
10 Best Glute Exercises With Resistance Band
Here are the best 10 exercises for working out your glutes with a resistance band. You can do them at home or while travelling.
1. Band Side-Lying Leg Lift
The band side-lying leg lift is a good way to do the classic side leg raise, but with a resistance band. This modification increases the challenge and intensifies the workout for your glutes.
It is a great move to target the gluteus medius and minimus (smaller glute muscles on the outer hip).
Strengthening these smaller glute muscles can improve your overall stability and support better movement patterns in daily activities and athletic performance.
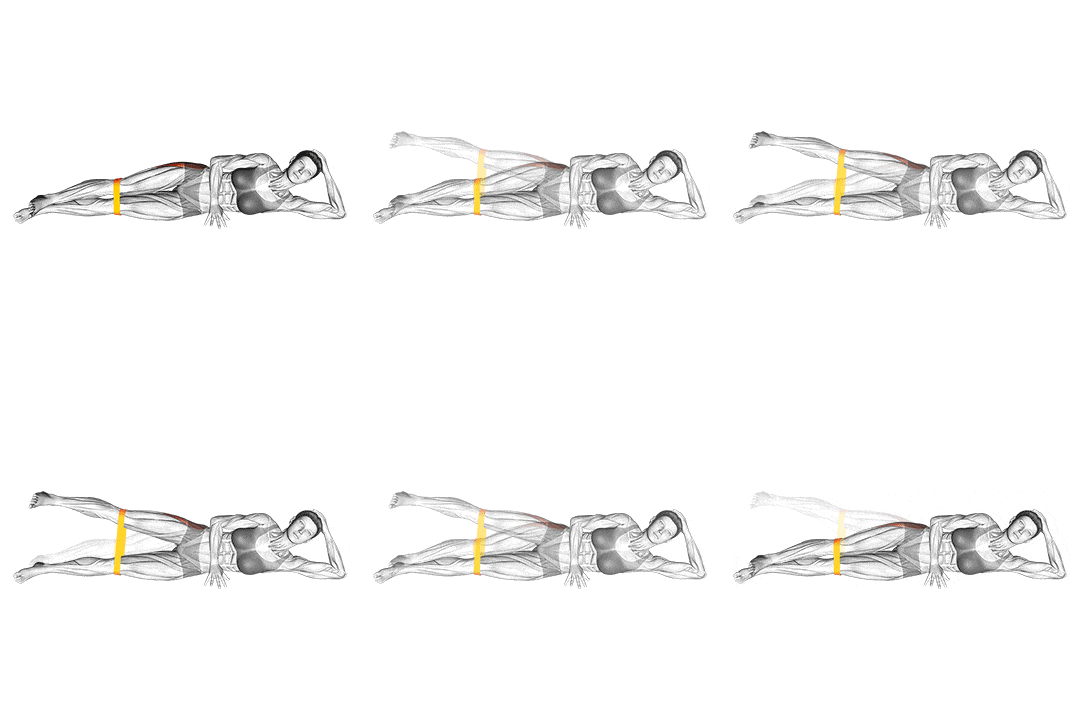
How To Do
- Lie down on your side with a resistance band around your ankles. Get comfortable—rest your head on your arm or prop it up with your hand, whatever feels best.
- Tighten your core and stack your hips vertically, one on top of the other. This helps target the right muscles.
- Slowly lift your top leg up while keeping your knee straight. Focus on control, not speed—you’ll feel that burn more this way.
- Lower your leg back down nicely and slowly, keeping the band tight for constant tension.
- Repeat for however many reps you’ve got planned, then switch to the other side.
- Point your toes slightly downward (dorsiflexion) to further emphasize glute activation.
2. Resistance Band Glute Bridge
The resistance band glute bridge is a highly effective lower body exercise for toning the glutes and hamstrings. It also strengthens the ankles and knees.
The band creates constant tension as you drive through your heels and squeeze those glutes at the movement’s top. That means your glutes have to work overtime to maintain control and keep your hips thrust high.
It is excellent for those unable to perform squats due to pain. Unlike squats, the glute bridge places little pressure on the lower back.
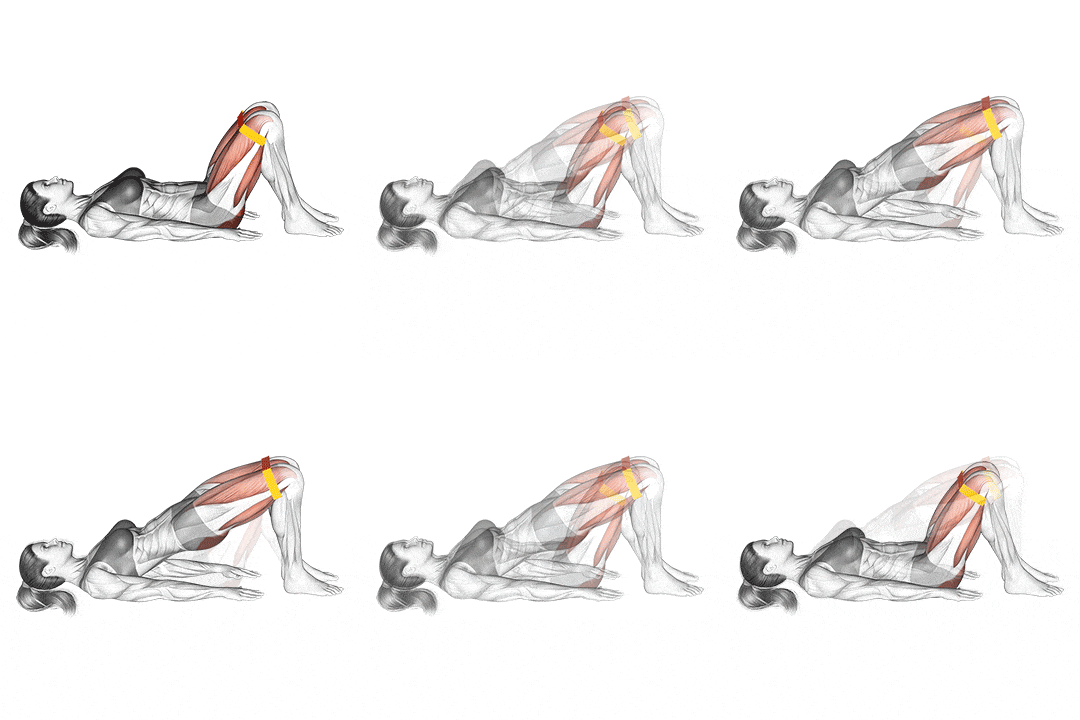
How To Do
- Lie flat on your back on a mat. Bend your knees and place your feet flat on the floor. Your arms should rest at your sides with palms facing down.
- Now, take a resistance band and place it right above your knees. Ensure the band is taut; if it’s slack, adjust your knees outward until you feel tension.
- Before you start, please engage your core by pulling your belly button toward your spine.
- Press through your heels and drive your hips upward towards the ceiling. Push your knees outward against the band to keep tension and activate the glutes effectively when lifting.
- Once you’ve reached the top, slowly lower your hips back down to the starting position. Don’t let them drop – control the descent.
- Gradually lower your hips back down to the starting position while maintaining control. Avoid letting your lower back arch excessively; focus on using your glutes to lower yourself.
- If you really want to level up the difficulty, try holding a weight plate on your hips or wearing a resistance band around your thighs. But master the basics first before adding those advanced variations.
3. Band Clamshell
The band clamshell is a simple exercise, but don’t let it fool you. It delivers major benefits for hip strength and glute activation (isolates the gluteus medius).
Physical therapists might recommend the clamshell exercise for lower-body injury prevention or rehabilitation. It can be helpful for people with knee pain, hip bursitis, or hip impingement.
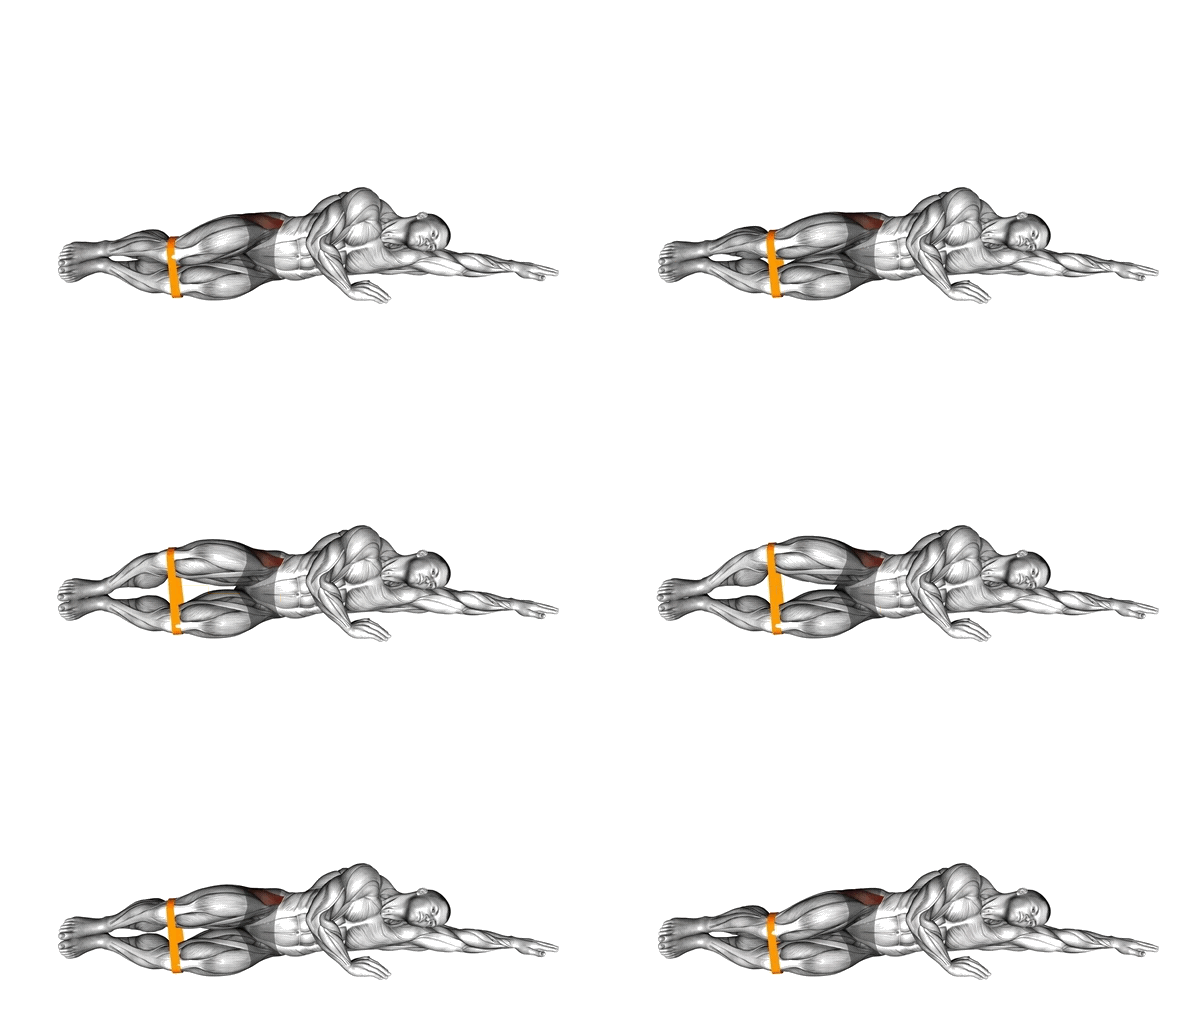
How To Do
- Place the band around both legs, just above the knees.
- Lie on one side with knees at a 45-degree angle, legs and hips stacked.
- Contract your abdominal muscles to stabilize your core.
- Keep your feet in contact with one another as you raise your upper knee as high as you can, without moving the hips or pelvis. Don’t allow your lower leg to move off of the floor.
- Pause at the top for a few seconds before returning the top knee to the starting position. Do 20 reps on each side.
4. Band Donkey Kick
The banded donkey kickback is a compound exercise that works the gluteus maximus, hamstrings and core muscles.
Band Donkey Kicks, help you:
- Build stronger glutes and hamstrings.
- Improve hip stability
- Developed functional lower body strength.
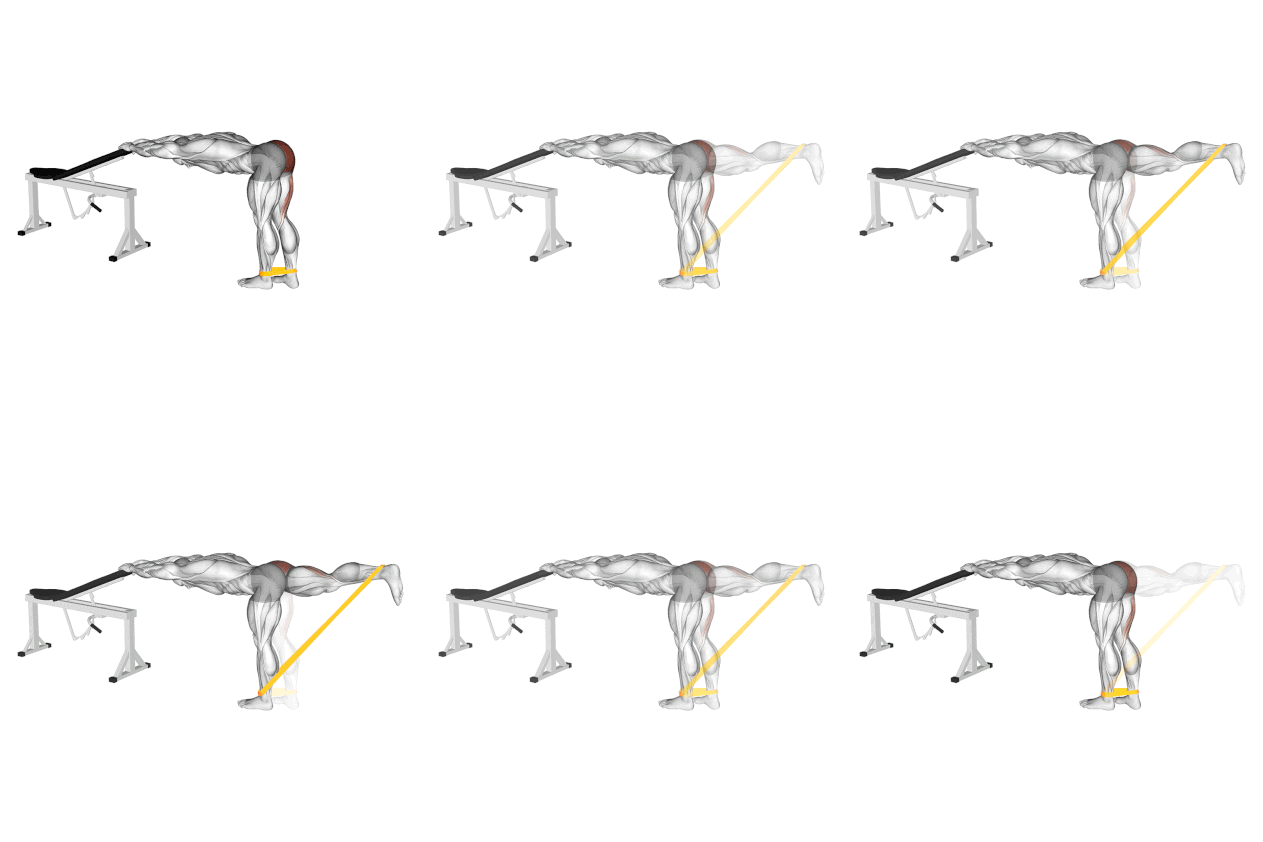
How To Do
- Find a sturdy surface (bench, chair, or table) about waist height
- Put yourself in front of it and keep your spine straight. Don’t bend your back too much.
- Loop one end of your resistance band under your right foot.
- Grip the other end with your right hand.
- Drive your foot straight back, like you’re trying to kick a door behind you.
- Lock out both your hip and knee completely. Feel it: Your hamstrings and glutes should be really working hard.
- Hold the position for a second, then slowly lower your leg back to the starting position.
5. Banded Pull-Throughs
You’ve seen someone doing this at the gym and thought “That looks weird.” I get it. But this exercise is actually a goldmine for building a stronger, more aesthetic lower body.
Here’s what makes it special: Full posterior chain activation:
- Glutes
- Hamstrings
- Hip flexors
- They also help your core muscles, hip flexors, obliques, and abs.
Remember: The best exercises aren’t always the prettiest ones. But the results? Those speak for themselves.
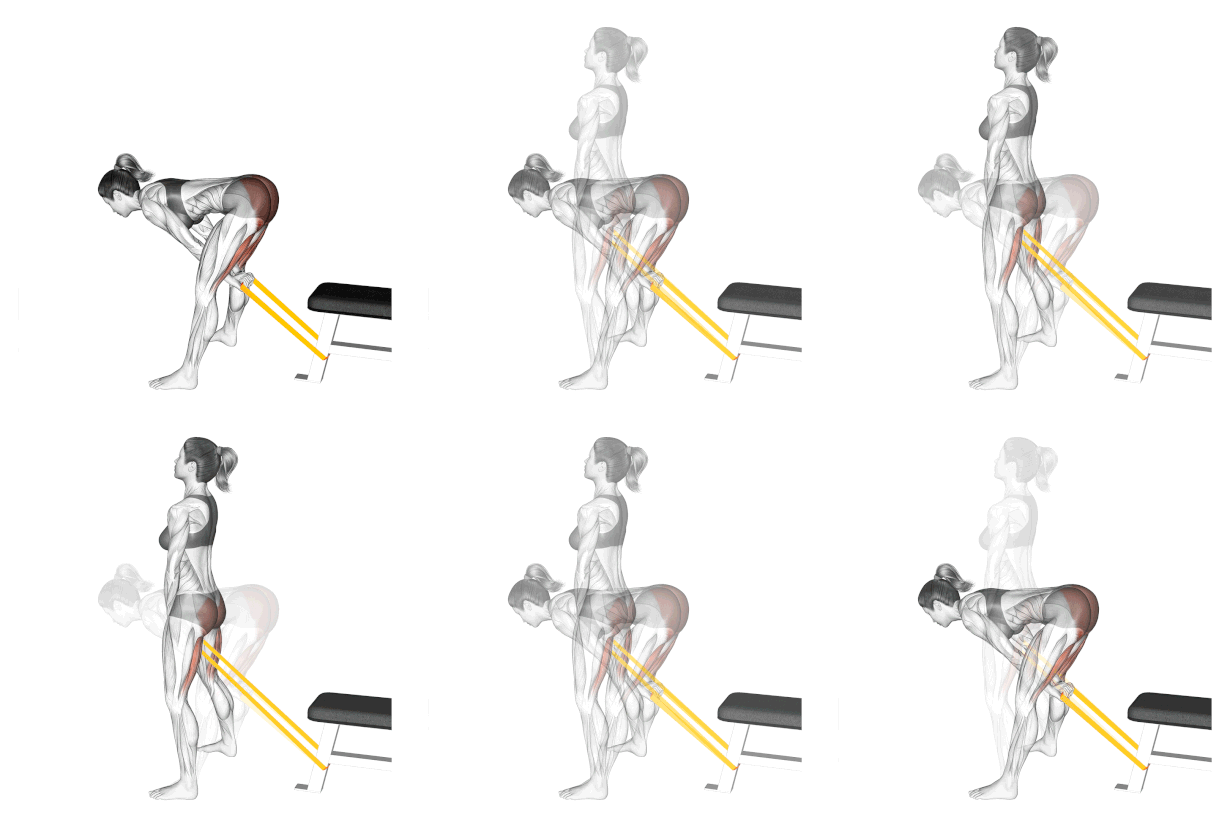
How To Do
- First, secure your band LOW. I’m talking ankle-height.
- Hook it around a sturdy pole or rack (make sure it’s stable – you don’t want any surprises mid-set).
- Position yourself like you’re about to hike a football: Face away from the band, feet planted shoulder-width apart. Think athletic stance.
- Reach between your legs and grab that band with BOTH hands. Take 2-3 steps forward until you feel tension. Not too much – we’re not trying to snap the band here.
- Slight knee bend and hips pushed back like you’re closing a car door with your butt. And keep you chest proud.
- Drive those hips FORWARD. Think about pushing through your heels and pulling that band through your legs until you’re standing tall.
- At the top, SQUEEZE those glutes like you’re trying to crack a walnut. Hold for a split second.
- Control is key on the way down. Let those hips drift back slowly. Feel that hamstring stretch.
- Rinse and repeat. Aim for 3 sets of 12-15 reps.
6. Kneeling Hip Thrust
The kneeling hip thrust with a resistance band may look different from the classic prone hip thrust, but the biomechanics are almost the same, especially the activation of the glutes.
As you perform this, you’ll feel your glutes engage like never before. This exercise specifically targets the gluteus Maximus.
You’ll also notice improved hip mobility over time. I’ve seen this firsthand – the controlled movement pattern helps loosen up those tight hip flexors we all get from sitting too much.
I’m curious – have you tried both variations? Which one feels more intense in your glutes? Drop a comment below and let me know your experience.
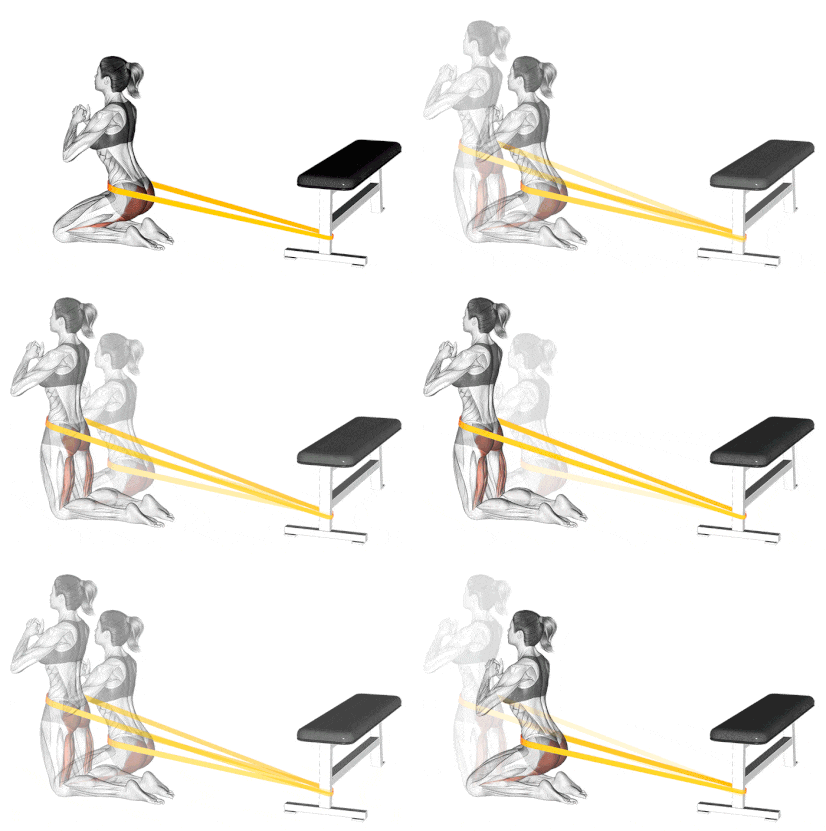
How To Do
- You must have a stable anchor point around which to attach the elastic.
- Place your hips into the free end of the band and kneel at a comfortable distance from the anchor point.
- Begin the movement by bringing your hips back, sitting on your heels, and bending your waist slightly forward.
- Engage your abs and contract your glutes to bring your hips forward and your torso upright.
- You should now be on your knees with your torso straight and your glutes engaged.
- Hold the position for a second and slowly return to the starting position.
- Repeat the movement until you have completed the required number of repetitions.
7. Lateral Band Walks
Lateral Band Walks, also known as miniband walks, are a lower-body exercise that targets the muscles on the outer thighs and glutes.
Lateral band walks can help reduce hip and back pain by strengthening the muscles that support these areas.
Variations
- Banded monster walks: To do banded monster walks, loop the resistance band around your ankles instead of your thighs.
- Banded side shuffles: To do banded side shuffles, simply shuffle sideways instead of walking.
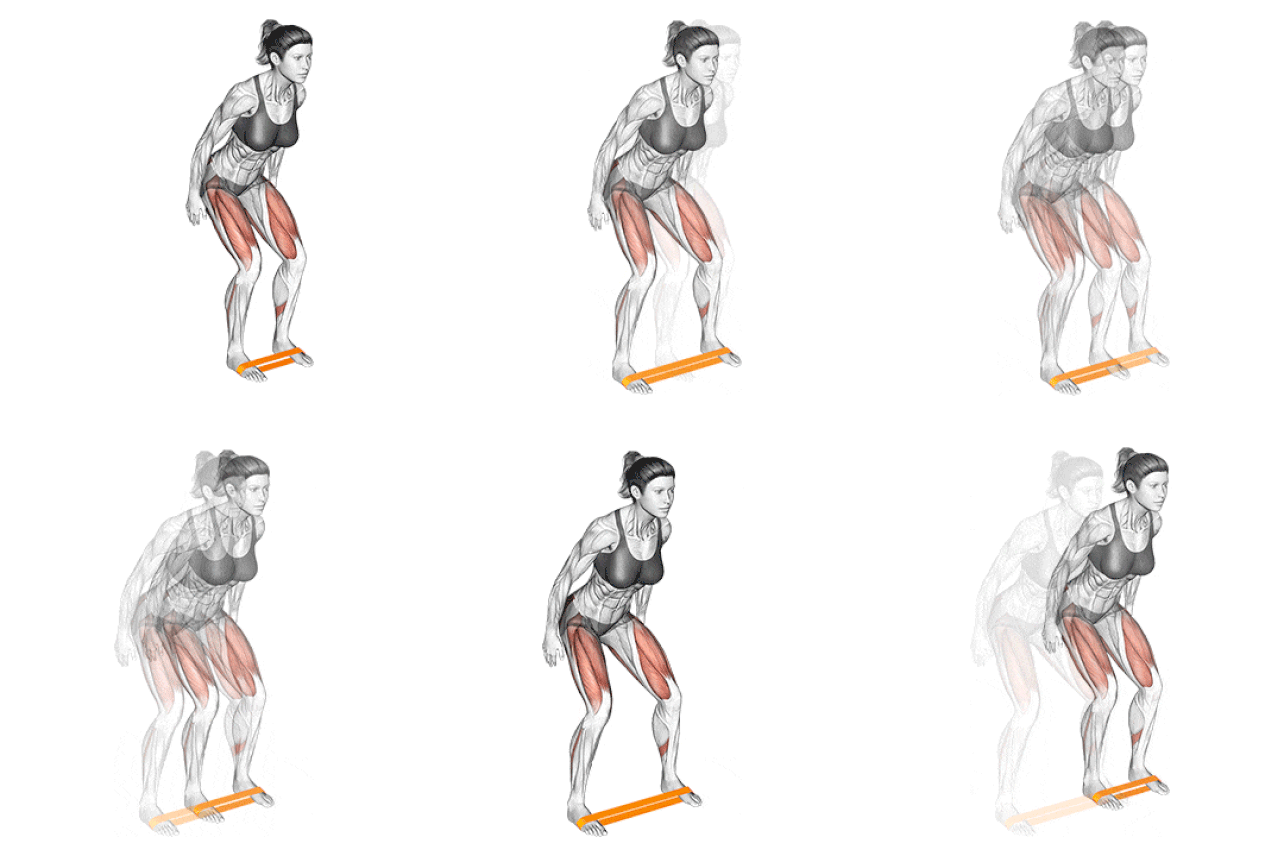
How To Do
- Start by placing a looped resistance band around your legs, just above your ankles.
- Stand with your feet hip-width apart and your knees slightly bent.
- Take a step to the side with one foot, stretching the band, and then bring the other foot in to return to the shoulder-width stance. This completes one step.
- Continue this pattern for a set number of steps in one direction, then switch to move in the opposite direction.
- For increased difficulty, place it just above the ankles; for decreased difficulty, place it above the knees.
8. Resistance Band Squat
The resistance band squat is a functional exercise that works the quadriceps, hamstrings, glutes, and core.
Resistance bands add additional load and resistance to regular squats, which allows for greater muscle activation.
One 2020 study found that the barbell back squat and the barbell hip thrust, both super glute-specific exercises, showed nearly equal improvement in overall lower body strength and performance.
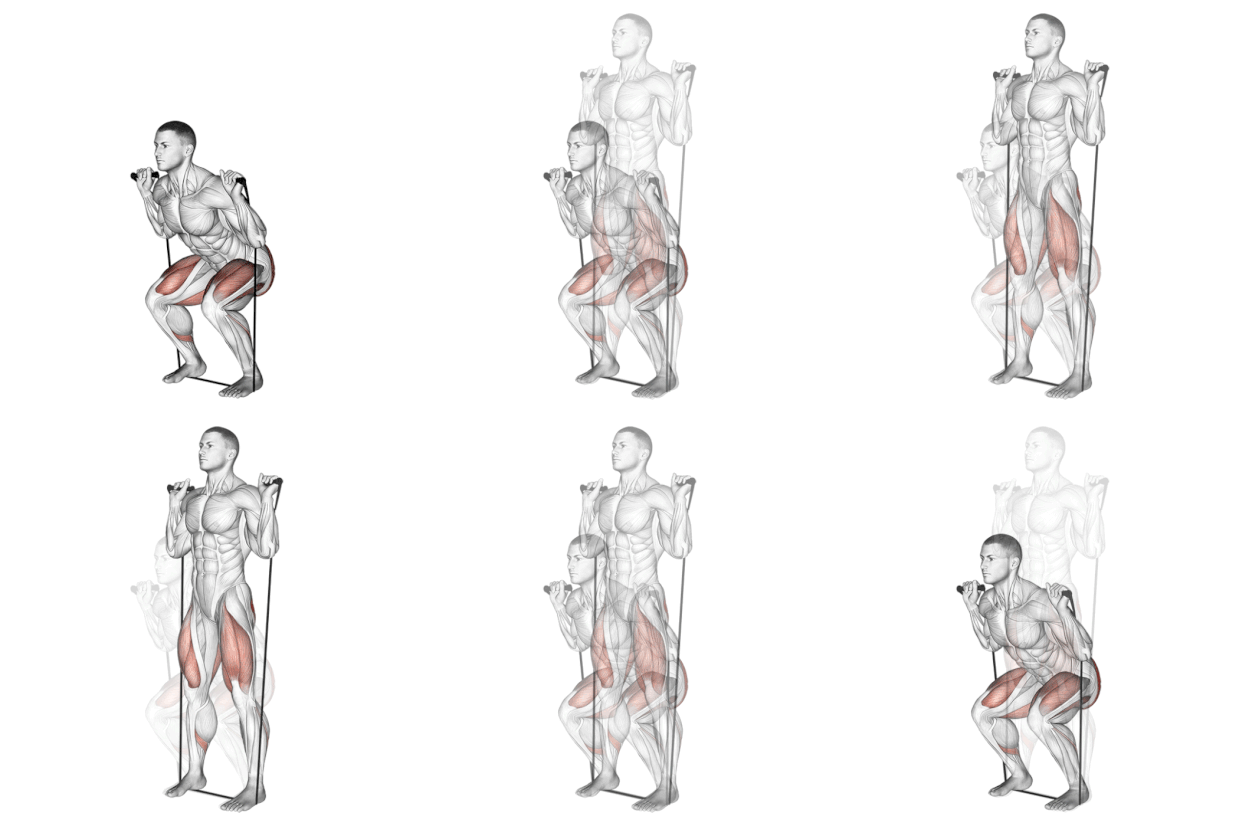
How To Do
- Start with your feet shoulder-width apart, knees bent, and toes pointed forward.
- Your toes point slightly outward like you’re standing on the numbers 10 and 2 on a clock face. The resistance band lies flat beneath your feet, centred under your arches like a bridge supporting your stance.
- Grasp the band ends firmly at shoulder height as if you’re about to start a boxing match. Your elbows naturally float near your ribcage, not flaring out.
- Begin by pushing your hips back, as if you’re reaching for a chair that’s just out of reach. Your knees start to bend, tracking over your toes like train cars following their rails.
- The band tension increases gradually as you lower, like a gentle spring coiling. Your thighs continue their journey until they’re parallel to the floor.
- At the bottom, you’ve created a perfect sitting position, though there’s no chair to catch you. It’s a momentary pause, like the quiet before a storm.
- Push through your entire foot as if you’re trying to press your footprints into concrete. Your body rises as one unit, like a hydraulic lift – smooth, controlled, and powerful.
9. Standing Band Hip Abduction
As you perform the standing band hip abduction, you’ll specifically target your hip abductors, including the gluteus medius and tensor fascia lata.
When you strengthen these muscles, your knees track better during movements like squats and lunges.
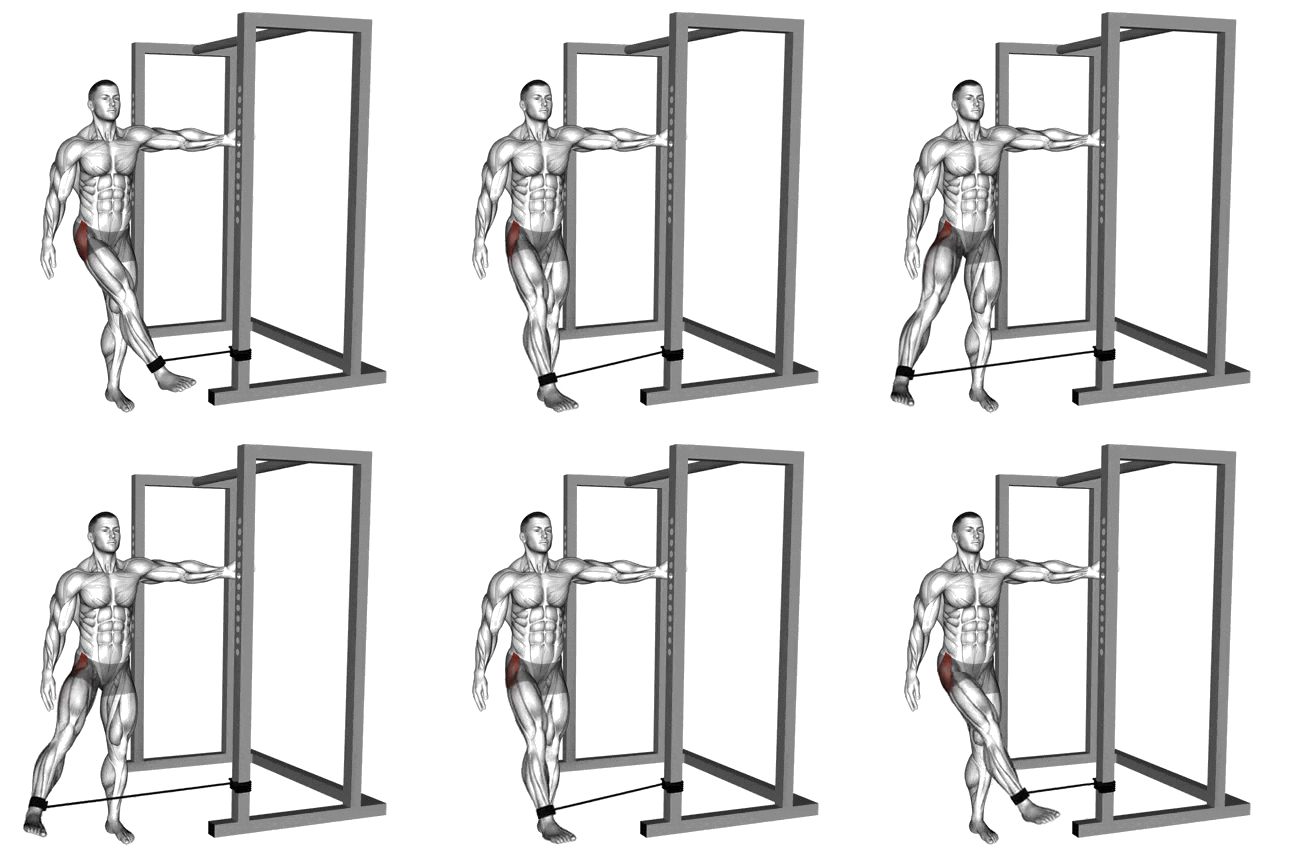
How to Do
- First, loop a resistance band just above your ankles (Pro tip: choose a band that allows you to maintain perfect form while feeling challenged by rep 8-10).
- Stand tall with your feet together. Think proud chest – imagine a string pulling your sternum toward the ceiling.
- Place your hand on a wall or sturdy chair. This isn’t cheating – it’s smart training that lets you focus 100% on the working muscles.
- Keep a slight bend in your standing leg (NEVER lock your knee), and lift your other leg out to the side.
- Your foot should point forward, not up at the ceiling. Think about pushing through your heel.
- Don’t rush the return. Control that band tension as you bring your leg back to center. Count “one-two” on the way down.
- Perform 10-15 slow, controlled reps to make a physical therapist proud. Then, switch sides.
10. Band Fire Hydrants
The band fire hydrant is a glute-focused exercise that simulates the action of a dog at a fire hydrant. It specifically targets the gluteus medius, minimus, and hip abductors.
When done regularly, fire hydrants can sculpt your glutes, improve back pain, and lower the risk for injury.
This exercise can help improve hip joint mobility.
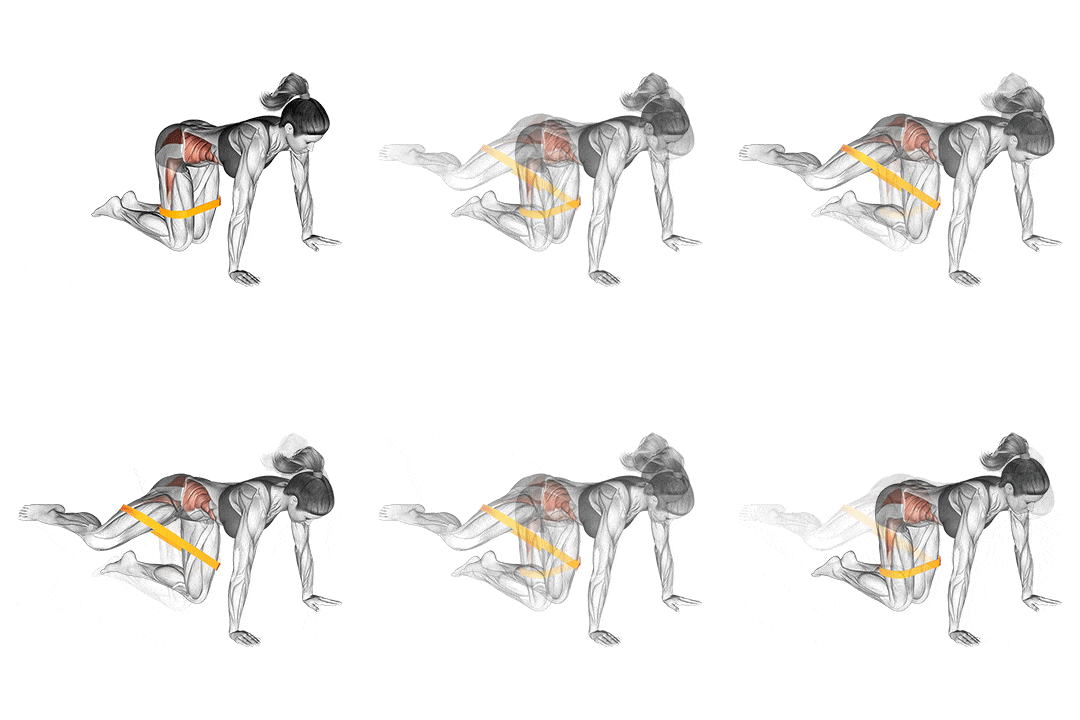
How to Do
- Begin on all fours in a quadruped position (hands under shoulders and knees under hips).
- Place a resistance band around your thighs, just above the knees.
- Keep your knee bent at 90 degrees and lift one leg to the side. Don’t let your hips rotate or dip sideways as you lift your leg.
- The movement should come from the hip joint, and the foot should align with the knee.
- Lower the leg back down to the starting position.
- Perform the desired reps on one side, then switch to the other.
Beginner Resistance Band Glute Workout Plan
| Exercise | Sets | Reps | Rest |
|---|---|---|---|
| Band Side-Lying Leg Lift | 3-4 | 10-12 | 90s |
| Band Glute Bridge | 3-4 | 12-15 | 90s |
| Band Donkey Kicks | 3 | 12-15 | 90s |
| Band Clamshell | 3 | 10-12 | 90s |
Conclusion
Resistance bands are a great way to tone and shape your glutes. They offer a flexible and cost-effective method for training your glutes at home or in the gym.
With resistance bands, you can execute various glute exercises that target the muscles from multiple angles. Exercises like banded bridges, hip thrusts, and kickbacks let you work the glutes thoroughly.
If you found this guide helpful, do me a quick favour:
- Bookmark it for your next workout
- Share it with one friend who’s been wanting to level up their glute game
- Try these moves for 30 days and let me know your results
Let me know in the comments below what specific challenges you’re facing, and I’ll create a detailed guide addressing them.
References
fitliferegime.com uses only high-quality sources, including peer-reviewed studies, to support the facts within our articles.
- Elzanie A, Borger J. Anatomy, bony pelvis and lower limb, gluteus maximus muscle. In: StatPearls. StatPearls Publishing; 2023.
- Whiler L, Fong M, Kim S, et al. Gluteus medius and minimus muscle structure, strength, and function in healthy adults: brief report. Physiotherapy Canada. 2017;69(3):212-216. doi:10.3138/ptc.2016-16
- Buckthorpe M, Stride M, Villa FD. Assessing and treating gluteus maximus weakness – a clinical commentary. Int J Sports Phys Ther. 2019;14(4):655-669.
- Comyns T, Kenny I, Scales G. Effects of a low-load gluteal warm-up on explosive jump performance. J Hum Kinet. 2015;46:177-187. doi:10.1515/hukin-2015-0046
- Lopes JSS, Machado AF, Micheletti JK, de Almeida AC, Cavina AP, Pastre CM. Effects of training with elastic resistance versus conventional resistance on muscular strength: A systematic review and meta-analysis. SAGE Open Medicine. 2019;7:205031211983111. doi:10.1177/2050312119831116
- Damien Kiernan, Rory O’Sullivan, Ailish Malone, Timothy O’Brien, Ciaran K Simms, Pathological Movements of the Pelvis and Trunk During Gait in Children With Cerebral Palsy: A Cross-Sectional Study With 3-Dimensional Kinematics and Lower Lumbar Spinal Loading, Physical Therapy, Volume 98, Issue 2, February 2018, Pages 86–94, https://doi.org/10.1093/ptj/pzx113
- Stastny, Petr PhD; Tufano, James J. MS; Golas, Artur PhD; Petr, Miroslav PhD. Strengthening the Gluteus Medius Using Various Bodyweight and Resistance Exercises. Strength and Conditioning Journal: June 2016 – Volume 38 – Issue 3 – p 91-101 doi: 10.1519/SSC.00000000000002213

Manish is a NASM-certified fitness and nutrition coach with over 10 years of experience in weight lifting and fat loss fitness coaching. He specializes in gym-based training and has a lot of knowledge about exercise, lifting technique, biomechanics, and more.
Through “Fit Life Regime,” he generously shares the insights he’s gained over a decade in the field. His goal is to equip others with the knowledge to start their own fitness journey.

Each of these exercises not only balances out the lower body in an appealing way but more importantly,when combined, promote the strength,flexibility,stability and ease of stiffness,weakness,pain in the hip flexors and lower body. They improve balance. At 68 I find these exercises to be invaluable and crucial to include in ones regular exercise regimen.