Look, I get it. Some of the most effective forearm exercises require nothing except your bodyweight and maybe a wall or door frame.
I’ve spent countless hours testing and researching bodyweight forearm exercises, and I’m going to share the ones that actually work.
No fluff, no nonsense – just practical moves that’ll have your forearms feeling like they’ve been through a torture session (in a good way).
These exercises are particularly effective because they target both the flexors and extensors of your forearms – muscles that most people ignore entirely until they’re struggling to open a stubborn jar of pickles.
Like any bodyweight training, it’s about progressive overload and proper form.

Bodyweight Exercises For Bigger And Stronger Forearms
Here are the 10 best bodyweight exercises to build bigger and stronger forearms at home.
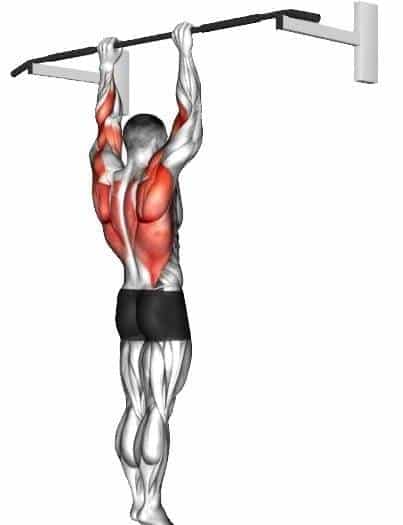
1. Dead Hangs
Does it sound simple? It is. But this basic move is secretly one of the most effective ways to build forearm strength and improve posture.
The study has shown that dead hanging is an effective exercise for improving forearm and grip strength and improving climbing performance.
Think of it like downloading a strength update for your entire upper body. Your forearms get the obvious upgrade, but your shoulders learn to sit right too.
The best part? You can’t screw it up. Either you’re hanging or you’re not.
Start with 30 seconds. Can’t make it? No problem – that’s your baseline. Can you hit 60 seconds easy?
How To Do
- You should place yourself under the bar. Reach up and grab it like you’re hanging onto the edge of a cliff (palms facing away from you).
- Space your hands just past your shoulders. Not too wide – you’re not trying to do the splits with your arms.
- Let your body drop and fully stretch out. This is key: your shoulders should sink away from your ears. Keep your core tight.
- Hang there. Start with 20 seconds. Yeah, it’ll feel like an eternity at first. If you’re new to dead hangs, try shorter durations.
- To finish the exercise, release the grip and gently lower yourself down.
2. Towel Pull-Up
Towel pull-ups are a challenging variation of the traditional pull-up exercise that specifically targets grip strength, forearms, and upper body muscles, especially the biceps and back.
Hanging from towels forces your grip to work overtime.
This is why old-school strongmen used to train with thick ropes and odd objects. They knew something most gym bros forget: if you can’t grip it, you can’t lift it.
Want to test yourself? Try just hanging from the towels for 10 seconds. Yeah, it’s harder than it looks.
How To Do
- Grab a sturdy towel and fold it longways like you’re making a rope.
- Sling it over the pull-up bar. Make both sides even, unless you enjoy lopsided workouts.
- Death-grip those towel ends. Your hands should face each other like they’re having a staredown.
- Hang free from the towels and keep your body straight.
- Pull yourself up until your chin clears the bar. No momentum cheats. Just raw, painful strength.
- Slowly lower yourself back down to the starting position with control.
3. Lateral Plank Walk
The Lateral Plank Walk is a full-body exercise that mainly targets your core, shoulders and arms. Take a walk on the wild side as well, as wild as a plank can get.
This move intensely engages your core like a classic plank, but the side-to-side motion works your forearms and delts, too. Plus, it’ll challenge your balance and stability.
The faster you “walk,” the more challenging this will be cardiovascular. Slow down if you need to dial down the intensity a bit.
How To Do
- Get into a high plank. Your hands are under your shoulders, and your body is straight like a steel beam. No saggy hips allowed.
- Lock your core like someone’s about to punch your gut. Your body should be one rigid unit from shoulders to ankles.
- Step right with your right hand and foot (like a sideways spider). Your left side follows, but don’t rush it—that’s how you move.
- Shuffle right until you run out of space or satisfaction.
- Then, reverse the party. Head left until you’re back where you started.
- Three steps each way with perfect form beats 20 sloppy ones. Your forearms will be screaming about this tomorrow.
Know More: Plank Exercise: Benefits, Variations, Muscles Worked, Tips
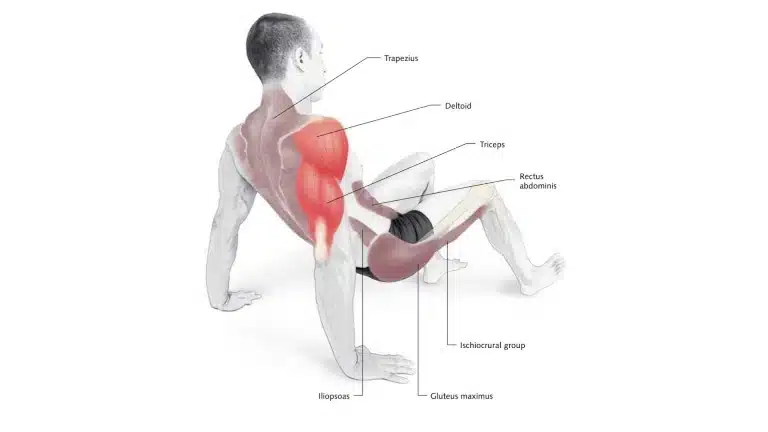
4. Crab Walk
Let’s be honest: You’ll look ridiculous doing this. But here’s the thing – looking like a confused crab is a small price to pay for what this move delivers.
When did you last see someone crab-walking at the gym? Never. Because most people are too busy doing bicep curls in the squat rack to discover this full-body beast.
Here’s what makes it secretly brilliant: Your forearms are forced to support and move your entire bodyweight from a strange angle. It’s like doing an upside-down plank while trying to escape a predator.
But it doesn’t stop there. Your shoulders get lit up, and your triceps and glutes wake up. Your core has to join the party. All while your quads and hamstrings play tug-of-war.
How To Do
- Sit on the ground with your feet hip-width apart and your knees bent. To ensure stability, perform it on a smooth, non-slip surface.
- Plant your hands behind you and point those fingers toward your butt – this keeps your wrists happy.
- Push your hips until they’re parallel with the ground. Squeeze those glutes like you’re trying to crack a walnut.
- Time to move. Lead with your hands (small steps, not giant leaps), then scuttle your feet forward. Think less “terrified crab” and more controlled chaos.
- Keep moving until your arms shake, your glutes burn, or you run out of space. Any of these means you’re doing it right.
- Keep those hand movements tight – about the length of a smartphone. Going too wide turns this into a shoulder destroyer.
5. Monkey Bar
Most adults avoid monkey bars. But this kid-sized device is secretly one of the best forearm builders you’re not using.
Every swing forces your grip to handle your entire body weight while moving. It’s like doing dozens of mini dead hangs, but with the added fun of possibly eating wood chips if you fail.
Your forearms? They’re working overtime. Not just holding on, but constantly adjusting as you swing from bar to bar. It’s like nature’s most brutal grip trainer.
Best part? It’s free. Every playground has them, and once you get past the awkward “yes, I’m a grown adult on monkey bars” phase, you’re golden.
How To Do
- Stand under the bars and make sure there’s enough space for you to hang free.
- Reach up and grab the first bar with your hands slightly wider than your shoulders.
- Start moving your body forward, generating momentum.
- Start by moving your hands one at a time to the next bar.
- Keep swinging and transferring your hands as you go through the bars until you reach the end of the structure or do the number of repetitions you want to do.
- Once finished, safely dismount from the bars. Ensure a safe landing.
6. Rope Climb
Rope climbs require you to use your arms and upper body strength to climb up a rope that is vertical. It would be best if you also had your legs to support and balance you.
It is a full-body exercise that primarily targets the muscles in the upper body, including the forearms, back, and shoulders.
Since rope climbs rely heavily on gripping the rope, they effectively improve grip strength and endurance.
How To Do
- Pick a rope that won’t snap. Seriously. If it looks like dental floss or feels older than your grandpa, find another one. Your
- Grab that rope with both hands up high, but here’s the key most miss: Your legs do more work than your arms. Think “squeeze and push” not pull until your arms explode.
- Left hand over right, squeeze with your legs, push through your feet. It’s like climbing a tree, but more painful and with 100% less branches.
- Keep climbing until either your grip gives out or you run out of rope. Both are valid stopping points.
- Coming down? Don’t be a hero. Lock those legs around the rope in an “S” shape and control your descent. Unless you enjoy rope burn – then by all means, slide freely.
7. Archer Push-Up
Regular push-ups are fine if you’re into vanilla fitness. But archer push-ups? They’re the dark chocolate of bodyweight training – intense, complex, and definitely not for everyone.
While one arm is doing a normal push-up, your other arm is stretched out like you’re trying to poke someone across the room. This turns your chest workout into a forearm blowtorch.
That straight arm is fighting to stabilize your entire body weight from a position that makes your forearm scream for mercy. Meanwhile, your working arm is basically doing a one-arm push-up with training wheels.
How To Do
- Start in a perfect plank. Not that saggy-hip – make your body stiffer than a board meeting.
- Now the fun begins: Shift your torso right like you’re dodging a punch. Your core should be so tight it could stop bullets.
- As you bend that right arm, think about pulling your right pec toward your hand. Like you’re trying to touch your armpit to your palm.
- That left arm? It’s not lounging – lock it straight like it owes you money. It should feel like you’re trying to push the wall across the room.
- Right arm bent like a regular push-up, left arm straight as an arrow. Your body should look like a bow ready to fire.
- Push back up, switch sides, repeat until your arms hate you.
8. Clapping Push Up
A clapping push-up is a variation of the traditional push-up that requires you to explosively push yourself up off the ground and clap your hands together before landing back down.
You’re not just pushing up – you’re literally launching your entire body off the ground with enough power to squeeze in a clap. Your forearms and chest have to go from zero to hero in a split second, then catch your falling weight without snapping your face into the floor.

How To Do
- Get into position on a solid plank with your hands planted firmly at shoulder width, core tight, and body forming a straight line from head to heels.
- Lower your body down until your chest touches the ground. Keep those elbows tucked at 45 degrees.
- Drive through your palms like you’re trying to push the earth away. As you explode upward, your hands should leave the ground completely.
- Clap your hands at the peak of your push. Focus on quick hand speed rather than pushing super high off the ground.
- Land soft and controlled, immediately ready for your next rep. Think “ninja-quiet” landing..
9. Handstand Push Up
If regular push-ups are level 1, handstand push-ups are the final boss battle of bodyweight training.
You’re basically overhead pressing your entire body weight while balancing upside down like a circus performer. Your forearms are not only working, they are having an existential crisis, trying to prevent you from becoming a human domino.
How To Do
- Place hands a few inches away from the wall and a little wider than shoulder-width apart.
- Take a handstand position with your heels touching the wall.
- Once you have kicked up, establish a strong, rigid midline position.
- While maintaining this position, try to lower yourself until the top of your head almost touches the floor.
- Press up with the same tightness you had, lowering yourself until your elbows reach full extension.
- Do the desired number of reps.
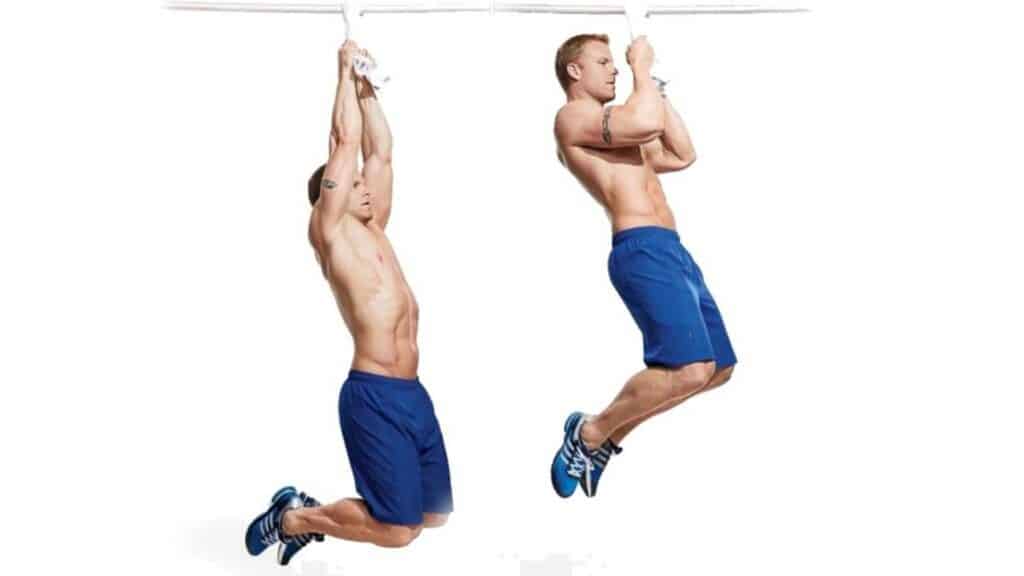
10. Chin Ups
A chin-up is an exercise in which the palms face towards the body while gripping the bar (overhand or pronated grip).
It is a challenging upper-body exercise that primarily targets the back, biceps, forearm and shoulder muscles.
The underhand grip used in chin-ups emphasises the forearm and hand muscles, improving grip strength and endurance.
How To Do
- Grip the pull-up bar with your palms facing towards you and use a narrow grip.
- Engage your core and keep your body in a straight line from your head to your heels.
- Pull your body up towards the bar by flexing your elbows and bringing your chest towards the bar.
- Once your chin is above the bar, hold for a moment and lower yourself slowly.
- Repeat for the desired number of reps.
- If you can’t do a full chin-up, you can start by doing them assisted, such as using a resistance band or a spotter.
Know More: 25 Different Types Of Pull Ups And Chin Ups (Variations)
Conclusion
After years of experimenting (and plenty of failed attempts), here’s what actually works:
Your forearms don’t respond to fancy stuff. They want brutal, simple work. Dead hangs until your fingers give out. Towel pull-ups that make you question your life choices. Rope climbs that leave your grip shot for days.
The secret? Progressive overload. But here’s the thing – it’s not just about adding weight. It’s about time under tension.
Sources
- Mathiowetz, V., et al. (2004). Grip and Pinch Strength: Norms for 6- to 19-Year-Olds. The American Journal of Occupational Therapy, 58(2), 97-104.
- Stasinopoulos, D., & Johnson, M. I. (2007). Cyriax Physiotherapy for Tennis Elbow/lateral Epicondylitis. British Journal of Sports Medicine, 41(11), 639-642.
- Mark D Peterson. et al Low Normalized Grip Strength is a Biomarker for Cardiometabolic Disease and Physical Disabilities Among U.S. and Chinese Adults. Multicenter Study J Gerontol A Biol Sci Med Sci2017 Oct 12;72(11):1525-1531. doi: 10.1093/gerona/glx031.
- Snarr RL, Hallmark AV, Casey JC, Esco MR. Electromyographical Comparison of a Traditional, Suspension Device, and Towel Pull-Up. J Hum Kinet. 2017 Aug 1;58:5-13. doi: 10.1515/hukin-2017-0068. PMID: 28828073; PMCID: PMC5548150.

Manish is a NASM-certified fitness and nutrition coach with over 10 years of experience in weight lifting and fat loss fitness coaching. He specializes in gym-based training and has a lot of knowledge about exercise, lifting technique, biomechanics, and more.
Through “Fit Life Regime,” he generously shares the insights he’s gained over a decade in the field. His goal is to equip others with the knowledge to start their own fitness journey.