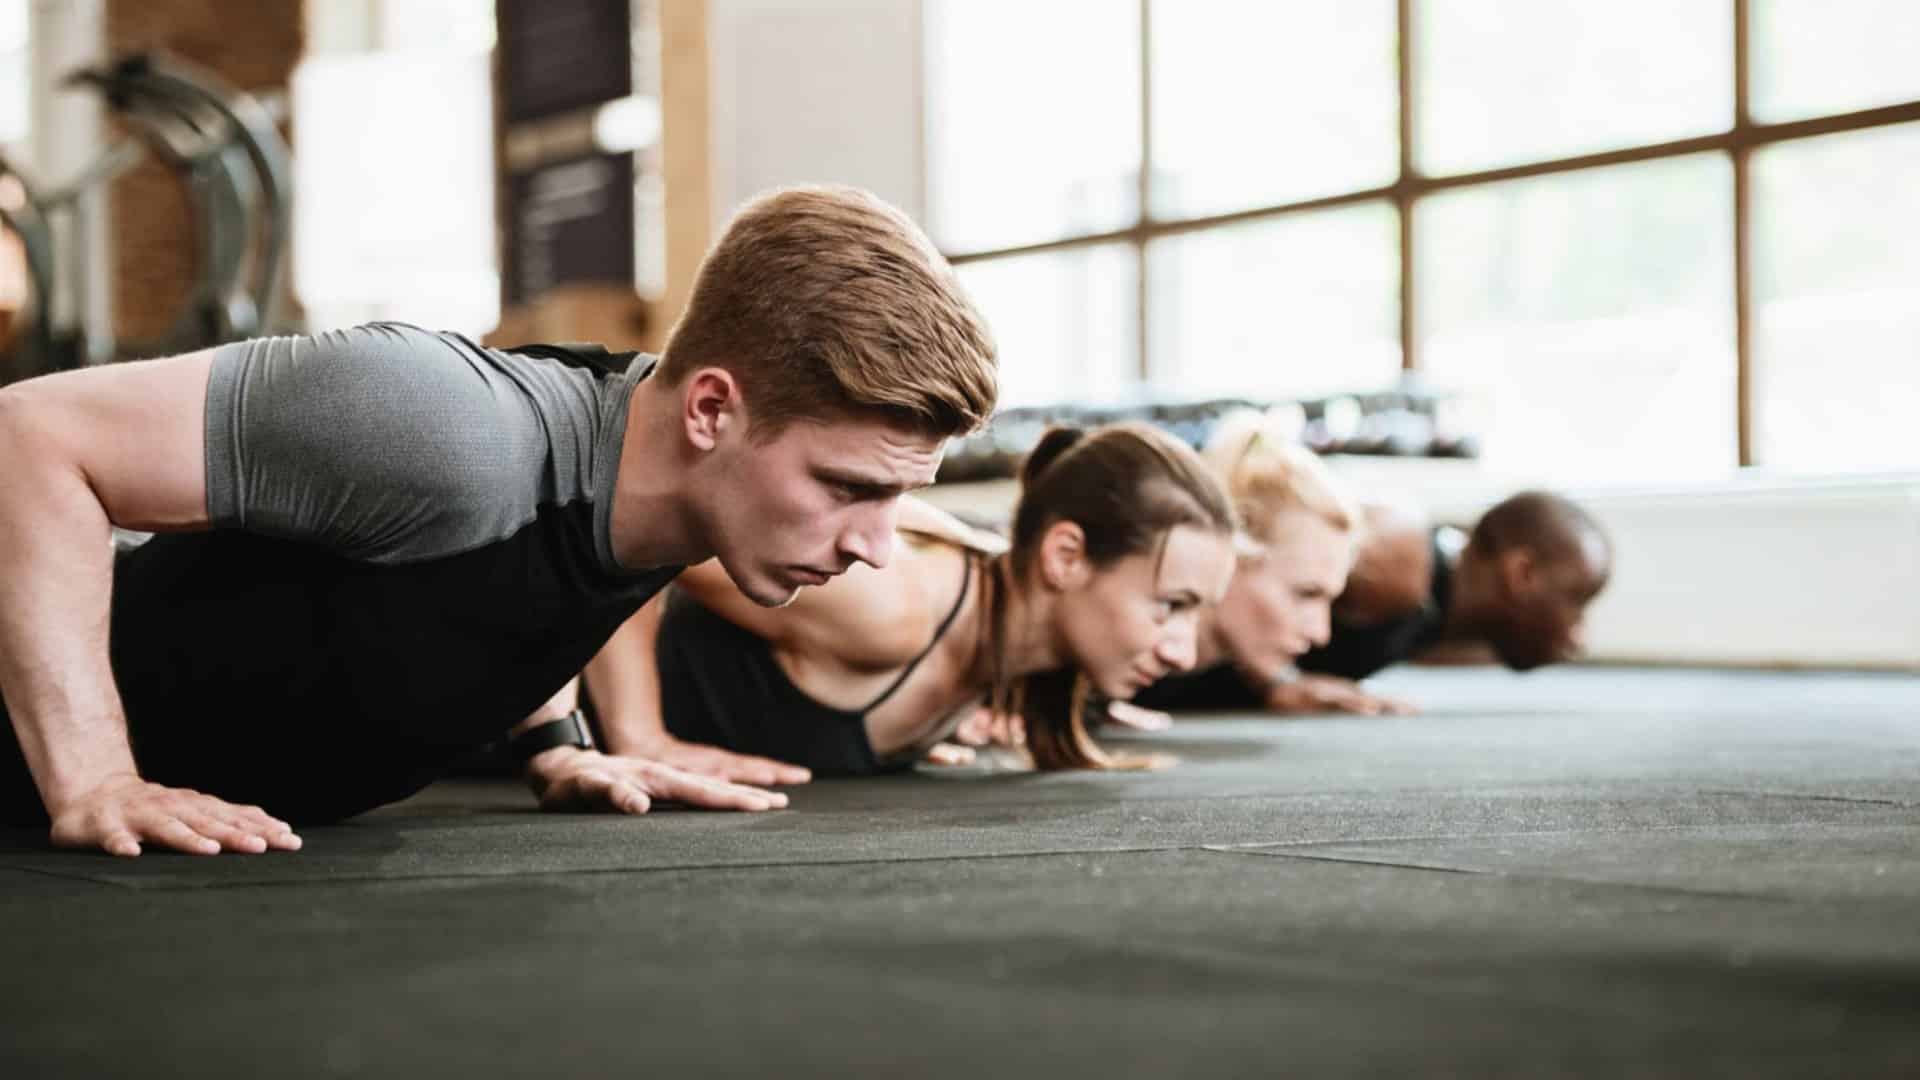
Want to get strong, toned arms without going to the gym? The good news is that, with just your bodyweight, you can define and make your arms appealing at home.
The great thing about bodyweight exercises is that they’re convenient and can be done anywhere. You don’t need a lot of time, either. If you spend 15 to 20 minutes every day, in a few weeks your arms will feel and look different.
Most arm workouts without weights are some version of push-ups, dips, and planks. These simple moves help you build strength in your arms and burn fat.
These exercises are good for anyone, no matter your fitness level. They’re especially good for beginners.
In this post, we’ll go over the 18 most effective arm exercises to do at home without any equipment for sculpted biceps and triceps.
- Utilizing Household Items for Arm Workouts
- 18 Arm Workouts Without Weights At-Home
- 1. Knee Push-up
- 2. Kneeling bodyweight triceps extension
- 3. Inverted Row
- 4. Standard Push Up
- 5. Shoulder Tap Push Up
- 6. Bicep Leg Curl
- 7. Bench Dips
- 8. Pike Push Up
- 9. Crab Walk
- 10. Chin Up
- 11. Clapping push-up
- 12. Parallel Bar Triceps Dip
- 13. Plank to Push-up
- 14. High Side Plank
- 15. Rolling Side Plank
- 16. Inchworm
- 17. Lateral Plank Walk
- 18. Arm Circles
- Benefits Of Bodyweight Arm Workouts (Without Weight)
- Takeaway
Utilizing Household Items for Arm Workouts
Several household items can be used to add resistance to arm workouts and help build muscle strength:
- Water bottles or canned goods: These can be used as makeshift dumbbells for bicep curls, tricep extensions, and other arm exercises.
- Towels: Towels can be used for various arm exercises, such as towel bicep curls, tricep extensions, and lateral raises.
- Stairs: Stairs can be used for tricep dips, push-ups, and other lower body exercises targeting the arms.
- Chair: A sturdy chair can be used for tricep dips, push-ups, and other exercises that target the arms and upper body.
- Backpack: A backpack filled with books or other heavy items can be used for exercises like weight push-ups, weighted dips, bicep curls, and tricep extensions.
It’s important to use caution when using household items for workouts and ensure they are stable and secure before starting any exercise.
18 Arm Workouts Without Weights At-Home
Here are the best arm workouts without weights to help you build the arm without iron. You can use these as part of a regular workout or as a standalone circuit.
1. Knee Push-up
The knee push-up is a brilliant bodyweight exercise for beginners that targets muscles throughout your upper body, including the chest, triceps, and shoulder.
It is an easier push-up variation if you are having trouble performing a standard push-up.
How To Do It
- Kneel on the floor. Put your arms out in front of you with your hands shoulder-width apart.
- Lower yourself by flexing your elbows to close your chest to the floor.
- Make sure your body is in a straight line from your head to your knees.
- Push up with your arms and raise your body to the starting position.
Tips
- Keep your back straight — never rounded! — throughout the move.
- Tighten your abs and butt to work your core.
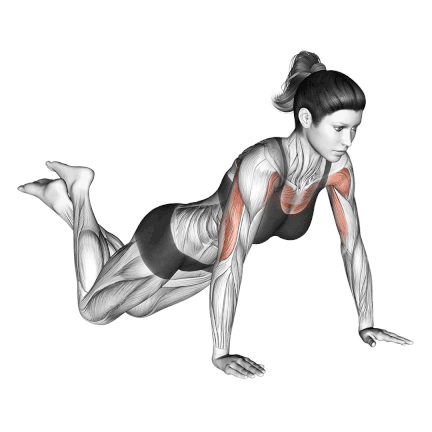
2. Kneeling bodyweight triceps extension
kneeling bodyweight triceps extension is one of the best arm exercises to isolate your triceps without weights or dumbbells, barbells, and weight machines.
For those with limited upper body strength, this is a perfect beginning’s workout; it can also be used to progressively develop muscle and strength.

How To Do It
- Get on all fours with your hands together under your chest
- Lower your elbows to the floor, shoulder-width apart.
- Lean forward so that your body weight is supported by your elbows.
- Exhale as you push your body off the floor by extending your elbows.
- Inhale as you lower your elbows to the starting position by flexing your elbows.
Tips
- Keep your elbows tucked into your body. Do not flare them out.
- Stop the exercise if you feel pain in your wrists
3. Inverted Row
The inverted row is another name Bodyweight rows. It’s putting your body horizontally, making it easier to perform.
In the gym, most people do this exercise on the Smith machine.
At home, though, you can do the inverted row by laying under a chair, holding the sides of the chair, and dragging yourself up.
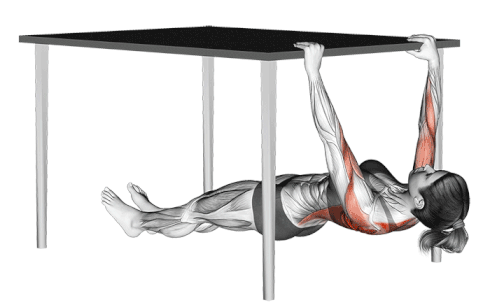
How To Do It
- Adjust the height of the chair and bar so that it’s a little higher than arm’s length from the floor.
- Lie under the bar with your legs and body straight.
- Grasp the bar with an overhand grip that’s a little wider than shoulder width.
- Keeping your legs and body straight, exhale as you pull your chest up to the bar.
- Hold for a count of two and squeeze your back muscles.
- Inhale as you lower your body until your arms and shoulders are fully extended. Repeat.
Tips
- Do not allow your butt to sag.
- Grab the bar with your hands slightly closer together and keep your elbows at an angle to your body, similar to doing a bench press.
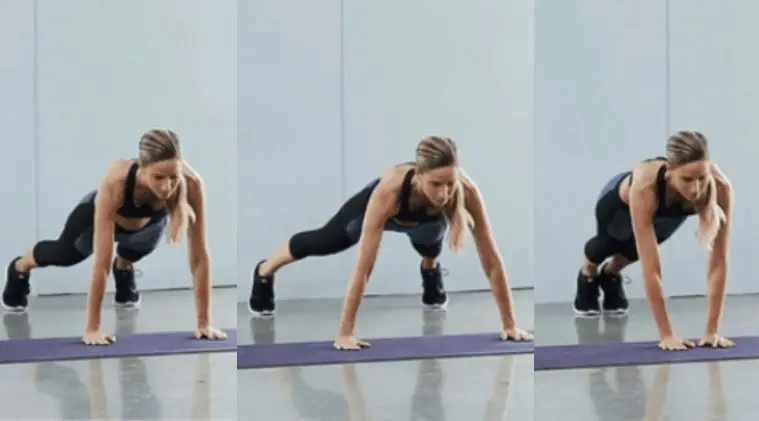
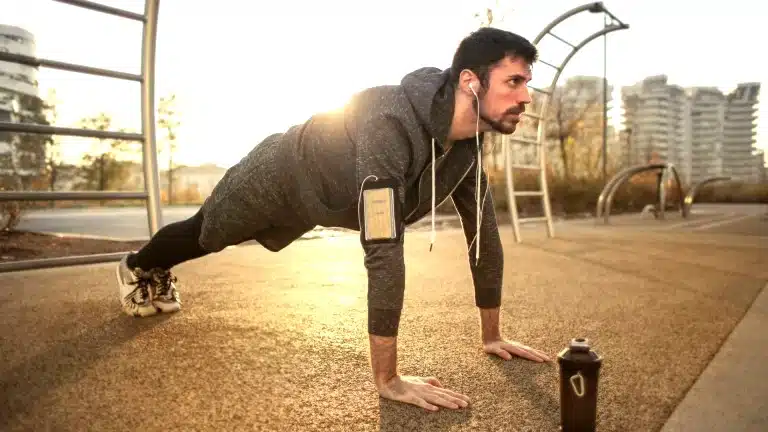
4. Standard Push Up
Push-ups are the best bodyweight calisthenics exercise to build your entire upper body, shoulders, chest, and arms.
Perform push-ups to increase arm, shoulder, and chest muscle and strength.

How To Do It
- Lay face down on the ground with straight legs and arms supporting the upper body. Keep your knees off the ground.
- Raise yourself off the ground, straightening your elbows and your arms. But keep your elbows close to your body.
- Raise until your elbows are locked, and pause momentarily at the movement’s top.
- Now, lower your body under slow, sustained motion, feeling the motion all the way down until your chest is very close to the ground.
5. Shoulder Tap Push Up
The shoulder tap push-up is a full-body strength move that focuses on your arms and chest while also strengthening your core.
Once you can do at least 10 full push-ups, you should be able to start incorporating some shoulder taps into the mix. Be sure to rely based on your core for most of the move.

How To Do It
- Start in a high plank position with your palms flat on the floor, hands shoulder-width apart, shoulders stacked directly above your wrists, and legs extended behind you.
- Lower yourself by flexing your elbows so that your chest comes within a few inches of the floor, ensuring your body is straight from your head to your knees.
- Raise your body to the starting position by pushing up with your arms. Tap your left hand to your right shoulder while engaging your core and glutes to keep your hips as still as possible.
- Place it back on the floor and repeat your next push-up and shoulder tap with another hand.
Tips
- Tighten your core, engage your glutes, and align your spine, head, and neck.
- Your arms should resemble an arrow in the bottom position, not a “T.”
6. Bicep Leg Curl
Bodyweight bicep curls are a highly effective and convenient exercise that targets your biceps muscles using just your own body weight as resistance.

How To Do It
- Begin by sitting on a chair as close to the edge as possible. Then, place your right hand under your left thigh at the crease between your hamstrings and calves.
- Slowly curl your right up as high as possible—Exhale during this exercise portion.
- Hold for a couple of seconds. Then, slowly lower your leg back down so your foot is just above the ground—Inhale during this exercise portion.
- Repeat for the desired number of reps.
- Repeat the exercise with your left arm.
Tips
- Try to get as much range of motion as possible.
- You can perform a variation of the bicep leg curl lying down.
7. Bench Dips
The bench dip is one of the most fundamental, best exercises to build triceps strength and bigger arms. The bench dip only requires a bench, or any other sturdy surface that you can find at the time.
Bench dips are fairly simple to learn and can be done almost anywhere.
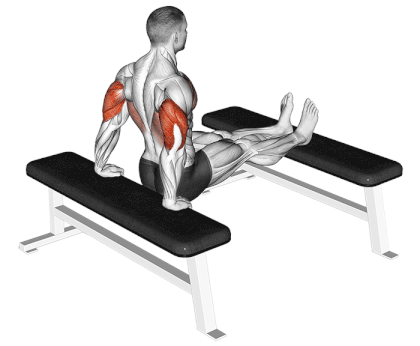
How To Do It
- Place your hands on the side of a flat bench so that your body is perpendicular to the bench when you place your feet out in front of you.
- Only your heels should be on the floor and your legs should be straight. keep your knees and hips bent.
- Your arms should be fully extended with just your palms on the bench.
- Bend your elbows to lower your body down until your elbows reach 90 degrees.
- Now, extend your arms to lift your body back to the starting position, flexing your triceps hard at the top.
Tips
- Really squeeze the triceps at the top of the movement to get the most out of this exercise.
- Do not dip down too low, as it places unnecessary strain on the shoulder joints.
8. Pike Push Up
Pike Push-ups are a variation of the push-up that increases strength and stability in the shoulders and triceps.
When performing the exercise more upright, you will target the shoulders more than your chest.

How To Do It
- Start in a standard push-up position.
- Lift hips up and back until your body forms an inverted V shape. Keep arms and legs as straight as possible.
- Slowly lower the top of your head towards the ground.
- Once your head is about to contact the ground, pause for a second.
- Then, slowly push back until your arms are straight and you’re in the inverted V position.
Tips
- Make sure you maintain control throughout the movement.
9. Crab Walk
The Crab Walk is excellent for toning, effectively targeting all upper arms, shoulders, upper legs, and core and working them difficult to build strength.
Moves like the crab walk are great total-body exercises that don’t require any additional equipment.

How To Do It
- Position your hands and feet so they are flat on the ground and your faces up.
- Lift your butt up off the ground by tightening your gluteal muscles.
- Begin “walking” by first moving your hands and then your feet.
- Avoid excessive shoulder strain by moving your hands no more than 6 to 8 inches at a time.
- Do not let your feet move too fast for your upper body so as not to injure your shoulders.
10. Chin Up
A chin-up is a compound exercise that targets the muscles in your biceps, back, and core.
Chin-ups can be challenging for beginners, so it’s important to start with a few reps and gradually increase as you get stronger.
If you find the exercise too difficult, you can use a resistance band or have a spotter assist you.
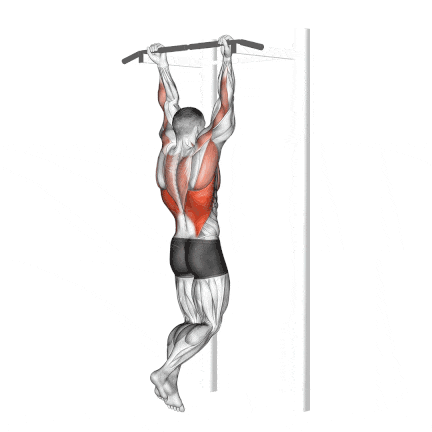
How To Do It
- Grasp a pull-up bar with an underhand grip, hands shoulder-width apart or slightly narrower.
- Straighten your arms, keep your knees bent and cross your lower legs.
- Retract your shoulder blades and pull your body until your chin aligns with the bar.
- Pause at the top for one to two seconds, with the biceps under maximum tension. Slowly lower to the start position.
Tips
- Don’t usually do half-reps; try to get as many reps as possible.
- Lower to almost full extension of the elbow, but avoid locking out completely.
11. Clapping push-up
Clapping Push-ups is an advanced exercise that works your chest, triceps, abs, and shoulders.
With this type of push-up, a “jumping” element is added to the exercise to make it more challenging and explosive.
Athletes perform this push-up to build strength, endurance, and speed.

How To Do It
- Start with a standard push-up.
- Start to lower your body as if you’re going to do a push-up until your chest almost touches the floor.
- Reverse the motion by pushing hard through the palms, just as your arms reach full extension, pull your hands up off the floor.
- Immediately clap the hands together and place them back in the original position before your body falls back to the ground.
Tips
- Be sure to exhale when exploding off the ground and inhaling on the way down.
- Do not let the elbows flare out. Keep the elbows close to your sides throughout.
12. Parallel Bar Triceps Dip
Parallel bar triceps dips are a highly effective compound exercise for the upper body, primarily targeting the chest and triceps muscles.
At home, you will need a stable surface roughly waist height—such as a bench or pair of strong chairs—to perform a triceps dip.

How To Do It
- Place your hands on the edge of the chairs or bench, palms facing down and fingers facing forward.
- Your arms should be straight and your feet should be flat on the ground.
- Engage your core and lift your hips off the ground. This will make your body straight and your hands will help you support your weight.
- Lower your body down by bending your elbows and allowing your hips to drop towards the ground.
- Once your elbows are at a 90-degree angle, push back up to the starting position, straightening your arms as you do so.
- Repeat for the desired number of reps.
Tips
- Do not lock out your elbows at the top of the movement.
- Keep your elbows close to your body and try to keep your upper arms perpendicular to the ground.
13. Plank to Push-up
A Plank to Push-up is a full-body exercise and variation of a plank. It is a compound exercise that targets the muscles in your arms, chest, and core.
Maintaining a plank position, you alternate between a forearm plank and a high plank.

How To Do It
- Start to get in a push-up position, bend your elbows, and rest your weight on your forearms instead of on your hands.
- Keep your core, butt, and quads tight, and avoid arching your back.
- Brace your core by contracting your abs as if you were about to be punched in the gut.
- Press your body up into the top position of a push-up by extending your arms one at a time.
- Pause, then reverse the movement and return to your elbows. That’s 1 rep
Tips
- Your body should form a straight line from your shoulders to your ankles.
- Avoid letting your hips sag during the exercise
14. High Side Plank
A high side plank is an advanced version of the classic side plank exercise. It strengthens your obliques and entire core and helps you work your way to a flatter tummy and stronger back.
It also strengthens your shoulders, arms, and upper back muscles.
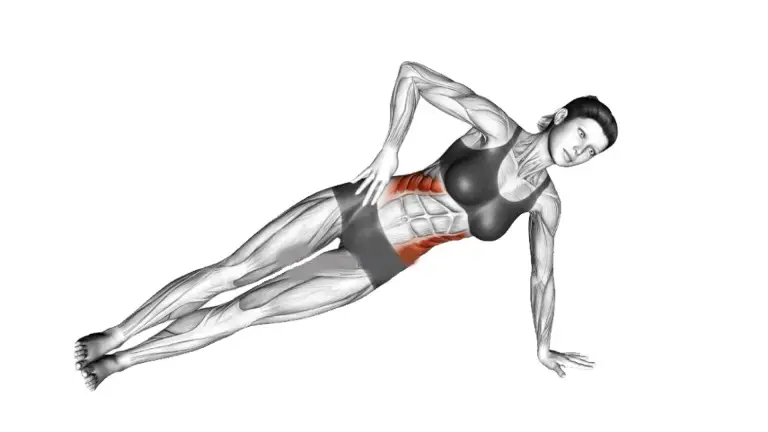
How To Do It
- Start in a side plank position with your forearm on the ground and your feet stacked or staggered for more difficulty.
- Put your right palm on the floor so that it’s parallel to your body and raise it up.
- Lift your torso until your right arm is straight underneath you.
- In this position, only your right arm and foot touch the ground.
- Your body forms a line that is about 20 degrees away from the ground.
- Keep your abs tight and hold this position for as long as possible. Then, repeat on the left side.
Tips
- Keep your legs and body straight.
- To stay stable, squeeze your abs and glutes during the exercise.
- Don’t let your hips dip or twist towards the floor.
15. Rolling Side Plank
The rolling side plank improves strength and endurance throughout the core, with an emphasis on the obliques. It also increases strength in the lower back and shoulders.
The rolling—or side-to-side—plank involves switching between left and right side plank, with a brief forearm plank in between (whew).
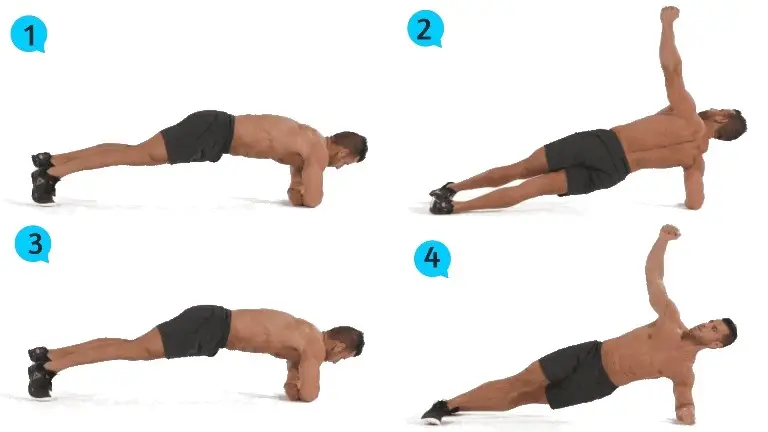
How To Do It
- Start to get in a push push-up position, bend your elbows and rest your weight on your forearms instead of on your hands.
- Keep your core, butt, and quads tight, and avoid arching your back.
- Now roll to your left forearm into a side plank with your right arm raised above you.
- Then roll back to the original plank position.
- Roll to your right forearm into a side plank with your left arm raised above you, and then return to the original plank.
Tips
- Avoid letting your hips sag during the exercise
- Do not let your hips sag during any part of the movement.
16. Inchworm
The Inchworm is a full-body exercise that increases strength and flexibility.
Your body weight is the only gym equipment you need to perform this low-impact exercise, which is highly effective.
Inspired by the rhythmic movements of inchworms, this move covers all the bases: core, arms, chest, and upper back.
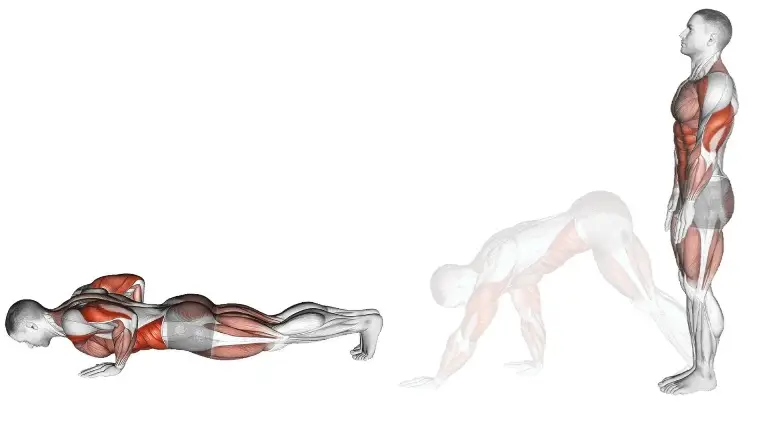
How To Do It
- Stand tall, your feet hip-distance apart. Hinge forward at your hips and place your palms on the mat. You can bend your knees if needed to get your palms flat on the floor.
- Walk your hands forward so that you’re in high plank. your body should form a straight line from your shoulders to your ankles. Brace your core by contracting your abs.
- Walk your hands back toward your feet, keeping your legs straight.
- Roll back up to a standing position.
Tips
- Try to prevent your torso from swaying from side to side during the exercise.
- Keep your legs straight, don’t let your hips sag, and maintain a neutral spine.
17. Lateral Plank Walk
It is a full-body exercise that intensely engages your core like a classic plank, but the side-to-side motion works your arms and delts, too.
The faster you “walk,” the more challenging this will be cardiovascular. Slow down if you need to dial down the intensity a bit.
How To Do It
- Start in a high plank position.
- Your body should form a straight line from your shoulders to your ankles. Brace your core.
- Take a step to the right, starting with your right hand and right foot and following with your left hand and foot, maintaining a plank position as you move.
- Do as much reps as possible in one direction, and then repeat the same number of reps in the opposite direction.
Tips
- Do not let your lower back sag or your butt rise.
- Keep your glutes and core muscles contracted.
18. Arm Circles
Arm circles are a low-impact exercise that is easy on the joints and can be done by people of all fitness levels.
It’s a great way to warm up your arms and shoulder muscles before a more intense workout.
A 2016 research review suggests that training muscle groups at least twice-weekly can maximize results.
How To Do It
- Stand with your feet shoulder-width apart and your arms extended out to the sides at shoulder height.
- Start by making small circles with your arms, moving them clockwise.
- Gradually increase the size of the circles as you get more comfortable with the movement.
- After completing several reps in the clockwise direction, reverse the direction and do the same number of reps in a counterclockwise direction.
Tips
- You can make your circles bigger as you progress and increase the repetitions for an added challenge.
- Make sure that your core is engaged, and your shoulders are relaxed.
Benefits Of Bodyweight Arm Workouts (Without Weight)
You can effectively train your arms by using this simple bodyweight exercise at home, and you don’t need any equipment for this.
Incorporating arm workouts without weights into your bodyweight workout plan offers several advantages.
- They can be done anywhere, anytime: All you need is your body, so you don’t need access to a gym or any specialized equipment.
- Don’t require any equipment: As mentioned above, bodyweight exercises don’t require any equipment, so you don’t have to worry about buying weights or other expensive equipment.
- Improve functional strength: Bodyweight Arm exercises mimic everyday movements, so they can help improve your functional strength, which is the strength you need to perform everyday tasks such as lifting groceries or playing with your kids.
- Improve your balance and coordination: Bodyweight exercises often require balance and coordination, which can help improve these skills over time.
- They can be modified for any fitness level: Bodyweight Arm exercises can be modified to suit any fitness level, so whether you’re a beginner or an advanced exerciser, you can still benefit from these types of workouts.
- Arm workouts without weights are perfect for the at-home exerciser with limited space. It also provides more flexibility as you can train as per your schedule.
Takeaway
To sum up, doing arm exercises without using weights can be a good and easy way to make your arms stronger and more toned at home.
Bodyweight exercises and household items can all be used to provide resistance and challenge your muscles.
It’s important to focus on proper form and technique, incorporate various exercises, and gradually increase intensity and difficulty to optimize your workouts and prevent boredom.
With a little creativity and dedication, you can achieve impressive results with arm workouts at home.
Thanks for reading, enjoy working workouts!
Stay Fit, Live a Happy and Healthy Life

Manish is a NASM-certified fitness and nutrition coach with over 10 years of experience in weight lifting and fat loss fitness coaching. He specializes in gym-based training and has a lot of knowledge about exercise, lifting technique, biomechanics, and more.
Through “Fit Life Regime,” he generously shares the insights he’s gained over a decade in the field. His goal is to equip others with the knowledge to start their own fitness journey.