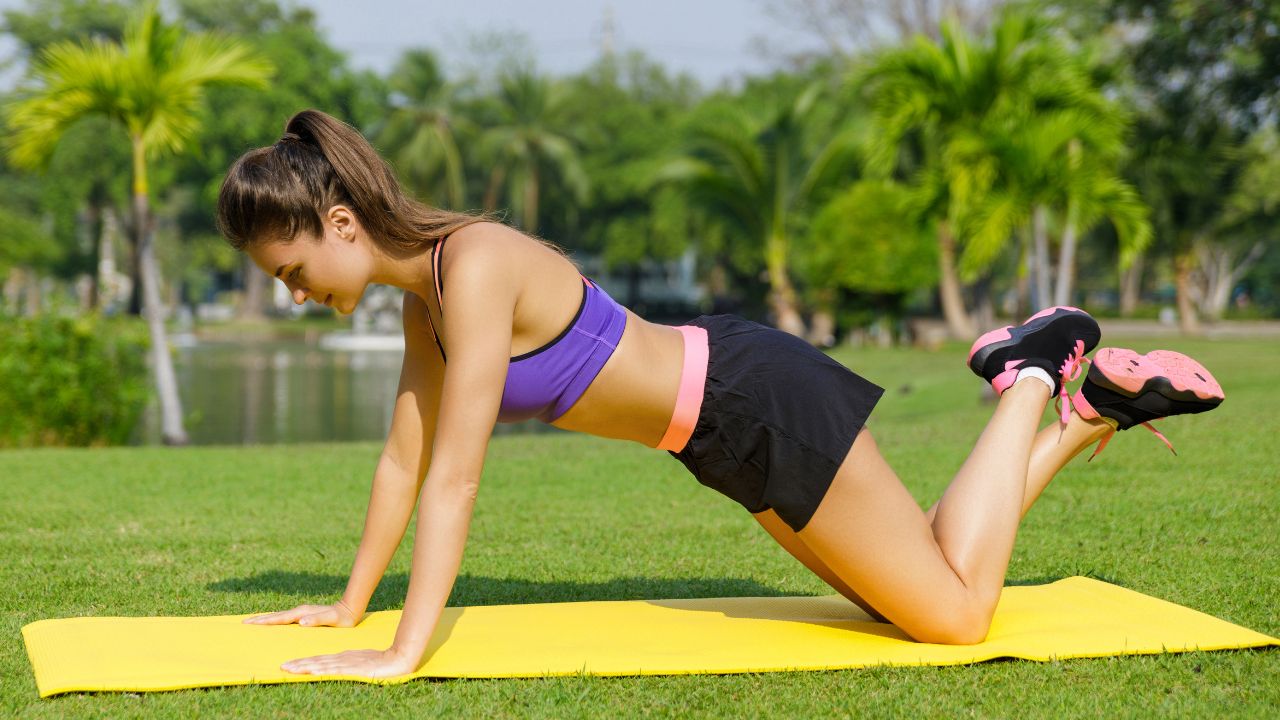
The knee push-up, also known as a modified type of push-up, is the most effective beginner-friendly upper-body exercise to build functional strength. It is a great way to strengthen your
If you have trouble doing the standard push-ups, knee push-ups are a good way to start. The exercise reduces the amount of body weight you are lifting.
In a standard push-up, your body pivots from your toes, which creates a long lever. But if you place your knees on the ground, you make that lever shorter by pivoting from your knees. This makes it easier to do the exercise because you have to lift less of your body weight. It’s a great way to make push-ups more accessible for everyone.
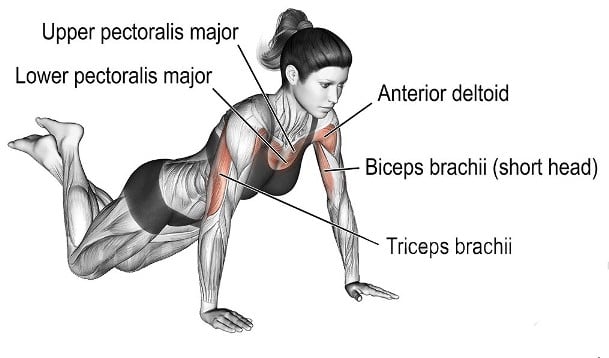
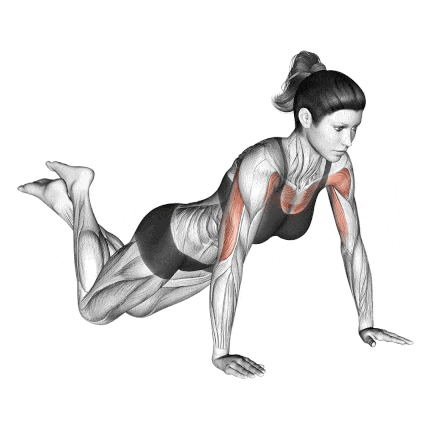
Despite the reduced load, knee push-ups still effectively engage the primary pushing muscles: the chest, shoulders, and triceps.
It can be performed regardless of where you are, and, best of all, they are completely free—no expensive equipment or no annual gym fees required.
Want to take your gains to the next level? Discover your daily calorie needs with our free TDEE calculator
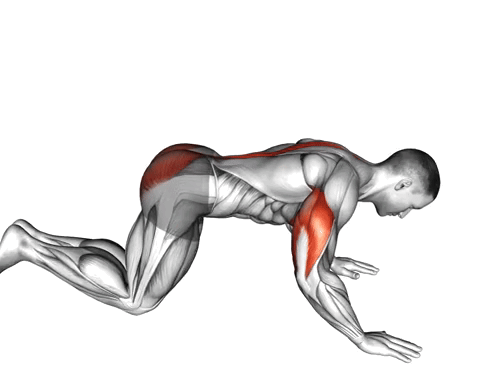
Muscles Worked During Knee Push-Ups
The knee push-ups are a bodyweight workout that targets various muscle groups.
The primary muscles worked during knee push-ups include:
- Chest (Pectoralis major)
- Triceps
The secondary muscle groups involved in this exercise are.
- Anterior deltoids
- Rhomboids,
- Trapezius
- Latissimus dorsi
- Serratus anterior
Stabilising Muscles Worked:
- Abdominals
- Obliques
- Glutes
- Quadriceps
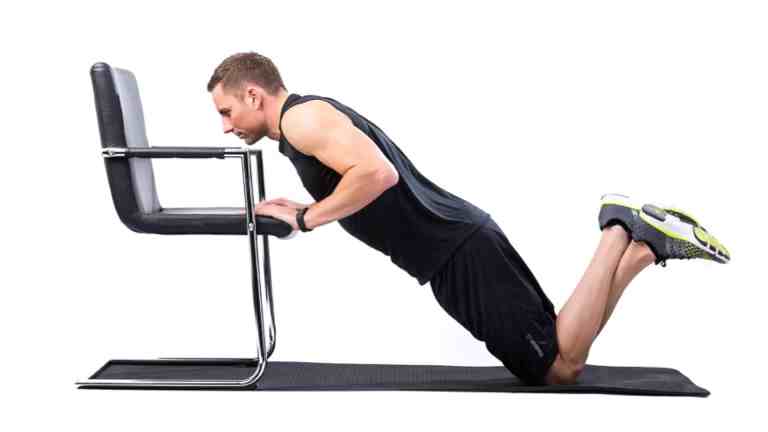
How To Do Knee Push Up
Before starting your workout, ensure you know how to do them properly. With a few changes, you can achieve positive changes in the strength and size of the chest, triceps, and shoulder.
Use it as your go-to reference anytime your technique needs a refresher.
- Begin in a tabletop position (hands and knees).
- Walk your hands forward until your body forms a straight line from your head, through your shoulders and hips, down to your knees.
- Place your hands slightly wider than shoulder-width apart. Fingers can point straight forward or slightly outwards (find what feels comfortable for your wrists).
- Imagine you’re creating a solid plank from shoulders to knees. No sagging hips, no butt sticking up in the air.
- Before you move, take a breath in and brace your core. Gently drawing your belly button towards your spine without rounding your back, or imagine preparing for a light punch to the gut.
- Bend your elbows to start the movement. Lower your chest towards the floor.
- Your elbows should track back at roughly a 45-degree angle from your body, not flare straight out to the sides.
- Lower until your chest is close to the floor, or your elbows reach about a 90-degree angle.
- Exhale as you forcefully push through your palms, extending your elbows to return to the starting position.
- Perform for the desired number of repetitions with controlled form on every single rep. Do 8-12 and 3–4 sets.
- As you build strength, gradually increase the number of repetitions and sets.
Proper Form And Tips
Follow the proper form and techniques to get the most out of this move.
- Constantly check: Are my head, shoulders, hips, and knees aligned? Imagine a ruler along your back. If you feel your hips sagging or piking (butt up), reset and re-engage your core.
- Don’t just think about your core; actively brace it throughout the entire movement, both down and up.
- If the floor is hard, place a yoga mat, towel, or padding under your knees for comfort. Pain shouldn’t limit your form.
- Go as low as you can while maintaining perfect form. Keeping your chest close to the floor is great, but only if your straight line and core brace remain solid. Prioritise quality alignment over hitting an arbitrary depth target.
- Beginners should start with 2–3 sets of 6–8 repetitions, and add more reps and sets as you build strength.
- Choose the exercises as per your fitness levels. Also, select your sets and repetitions based on your ability to maintain good technique throughout all sets and repetitions.
- Always keep the elbows slightly bent. Locking your elbows at the top of the movement puts too much stress on the joints and can lead to strain or injury.
- Avoid letting your hips sag or lift too high, as this can strain your lower back unnecessarily. Your body should be straight and rigid.
- Stay focused on your form and slow down all your movements.
- Remember to breathe consistently: inhale on the way down and exhale on the push-up.
- Your neck should be aligned with your body, not tilted up, which could strain the neck.
- Rest for 24 to 48 hours before training the same muscle groups to allow sufficient muscle recovery.
Knee Push-Ups Benefits
The benefits of regularly performing knee push-ups include:
- Knee Push-ups put far less stress on your wrist and significantly reduce the amount of body weight you are lifting.
- It’s perfect for beginners, anyone doing upper body and shoulder rehab, or older people who need to build upper body strength.
- Doing a bent knee push-up can be a powerful full-body workout and help to burn more calories.
- It will improve your metabolism, help you burn more fat, and make you look lean.
- Push-ups will improve the strength of the upper body and strengthen both muscles and bones.
- One of the benefits of knee push-ups is that they work multiple upper-body muscles at once.
- One advantage of push-ups is that they can also enhance the cardiovascular system by making your heart work harder.
- A beginner can easily do knee push-ups at home without any special equipment. All you need is the appropriate technique and determination.
To Stay Motivated: 150+ Gym Workout Motivational Quotes To Stay Fit
Best Variations and Modifications of Knee Push Up
One of the great things about knee push-ups is that they can be easily tweaked to suit different fitness levels and goals.
Changing your hand position, angle, range of motion, and more can either make the exercise easier for newbies or push it harder to keep gaining muscle.
The best knee push-up easy modifications and more advanced variations will be shown in this section.
1. Diamond Knee Push Up
The Knee diamond push-up is a variation of the traditional knee push-up, where the hand placement forms a diamond shape.
When you place your hands close together directly under your sternum, you force your elbows to tuck tightly against your sides as you lower. This maximizes elbow flexion and extension and puts the primary load on the triceps brachii.
While the triceps are the star, this close-grip position also increases activation in the clavicular head of the pectoralis major (upper/inner chest) and the anterior deltoids (front shoulders).
How To Do
- Kneel on a mat and place your hands on the floor.
- Your hands should be positioned in such a way as to create a diamond shape with your thumbs and index fingers.
- Keep your body straight and rigid and your elbows close to your body.
- Inhale as you slowly bend your elbows, bringing your chest towards the hands.
- Exhale as you extend your elbows and push your body back up to the starting position.
2. Incline Knee Push Up
Knee incline push-ups are a modified version of the traditional push-up that is easier to perform and puts less stress on the shoulders.
The incline position reduces the amount of bodyweight you’re lifting. It is a great starting point for beginners or those with limited upper body strength.
Start with a higher incline if you’re a beginner, and gradually lower the incline as you gain strength.
How To Do
- Use a stable and sturdy surface for your hands to ensure safety.
- Place your hands on an elevated surface slightly wider than shoulder-width apart.
- Kneel on the ground so your body forms a straight line from your knees to your head.
- Slowly lower your chest towards the elevated surface while inhaling.
- Reverse the motion when you’ve almost touched the board, and push yourself up to straight arms again while exhaling.
3. Hindu Knee Push Up
The Hindu push-up, also known as the dands or downward dog push-up, is a dynamic bodyweight exercise that combines strength, flexibility, and mobility.
Knee Hindu push-ups are great for beginners to build upper body strength and improve flexibility.
It is a full-body exercise that works the chest, shoulders, triceps, core, and back.
How To Do
- Start in a downward dog position with your feet hip-width apart and your hands shoulder-width apart.
- Lower your head and chest towards the ground, while keeping your hips high and your elbows close to your body.
- In a scooping motion, scoop your head upward while arching your lower and upper back and go into a cobra pose.
- Return to the starting position; you do not need to reverse back through the sweeping, arching motion.
- Repeat for 10–12 repetitions.
FAQs
How many knee push-ups do you do per day?
There’s no limit to how many knee push-ups you can do daily. The number of knee push-ups you do daily depends on your fitness level. You should start with push-ups on your knees if you are a beginner.
I recommend doing 8–20 push-ups a day. But do not stick to this number. It is important to keep increasing the number to challenge your body.
References
- Ebben WP, Wurm B, VanderZanden TL, Spadavecchia ML, Durocher JJ, Bickham CT, Petushek EJ. Kinetic analysis of several variations of push-ups. J Strength Cond Res. 2011 Oct;25(10):2891-4. doi: 10.1519/JSC.0b013e31820c8587. PMID: 21873902.
- Heather M. Wood & Ted A. Baumgartner (2004) Objectivity, Reliability, and Validity of the Bent-Knee Push-Up for College-Age Women, Measurement in Physical Education and Exercise Science, 8:4, 203-212.

Manish is a NASM-certified fitness and nutrition coach with over 10 years of experience in weight lifting and fat loss fitness coaching. He specializes in gym-based training and has a lot of knowledge about exercise, lifting technique, biomechanics, and more.
Through “Fit Life Regime,” he generously shares the insights he’s gained over a decade in the field. His goal is to equip others with the knowledge to start their own fitness journey.