The Smith Machine Hip Thrust is a highly effective strength-training exercise primarily designed to strengthen the gluteal muscles, hips, and lower back.
It is a variation of the traditional barbell hip thrust, performed using a Smith machine.
Many lifters struggle with the traditional barbell hip thrust because the bar rolls, the weight is awkward to balance, and the setup takes forever.
The exercise is done on a smith machine with a self-balancing barbell with guide rods, so you can focus on lifting the weight and don’t need to balance it.
Know More: 12 Most Effective Smith Machine Leg Workout & Exercises
- Smith Machine Hip Thrust Muscles Worked
- Primary Muscles
- Secondary Muscles
- How to Do Hip Thrust on Smith Machine
- 1. Setting Up Your Station
- 2. Body Positioning
- 3. The Vertical Shin Rule
- 4. Executing the Thrust
- 4. Adding Weight (If Applicable)
- Tips and Form
- Smith Machine Hip Thrust Variations & Progressions
- 1. Single-Leg Hip Thrusts
- 2. Elevated Foot Hip Thrusts
- 3. Resistance Bands
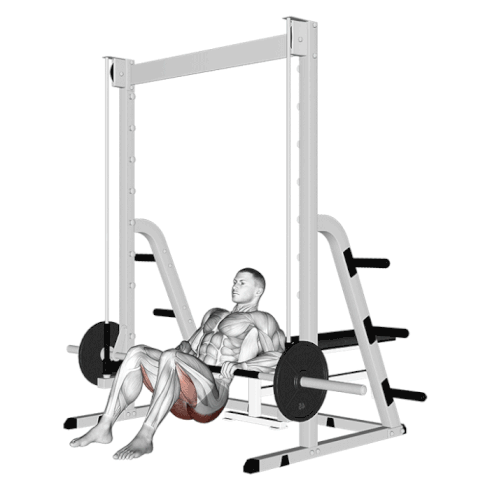
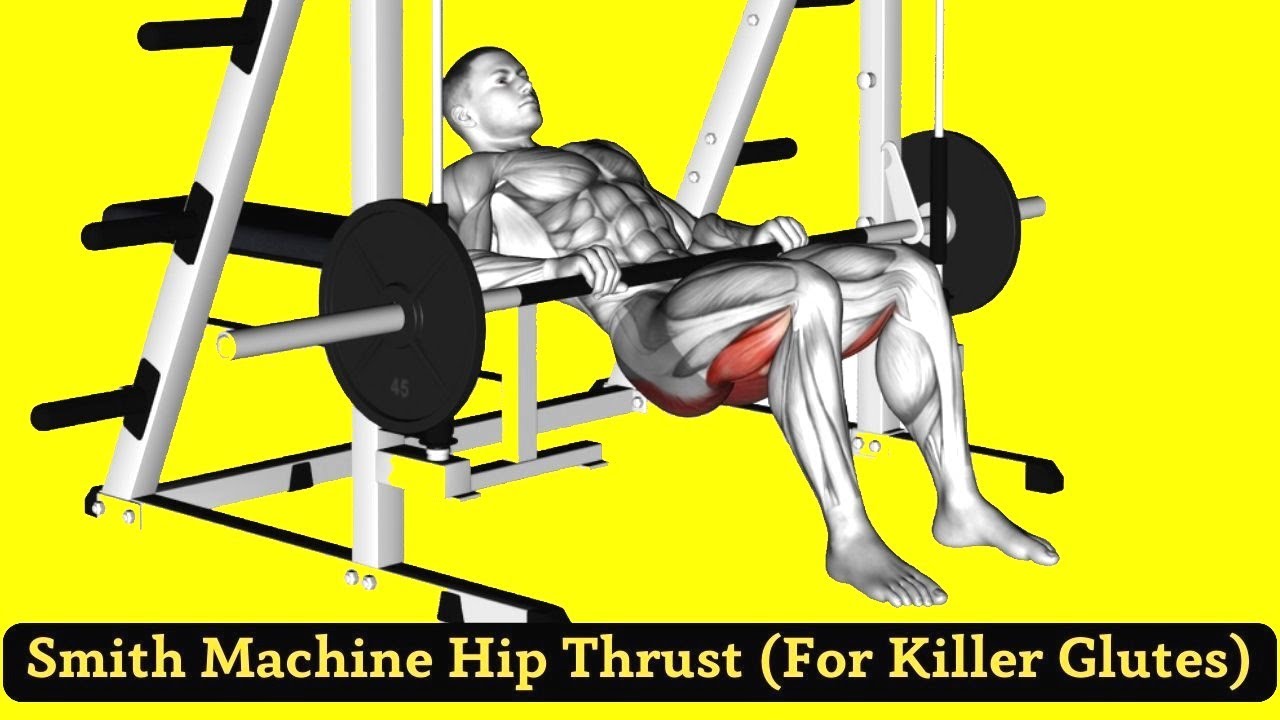
Smith Machine Hip Thrust Muscles Worked
Although it looks simple, the Smith machine hip thrust is a powerful compound movement that recruits multiple muscle groups.
Primary Muscles
- Gluteus Maximus – main driver of hip extension and the star of this exercise
- Gluteus Medius & Minimus – assist with hip stability and alignment
Secondary Muscles
- Hamstrings – assist in hip extension
- Quadriceps – help stabilize the knee
- Erector Spinae (lower back) – spinal stabilization
- Core (abs & obliques) – maintain pelvic control
- Hip adductors – assist with stabilization
When foot position, pelvic tilt, and depth are correct, glute activation is maximized while unnecessary lower-back strain is minimized.
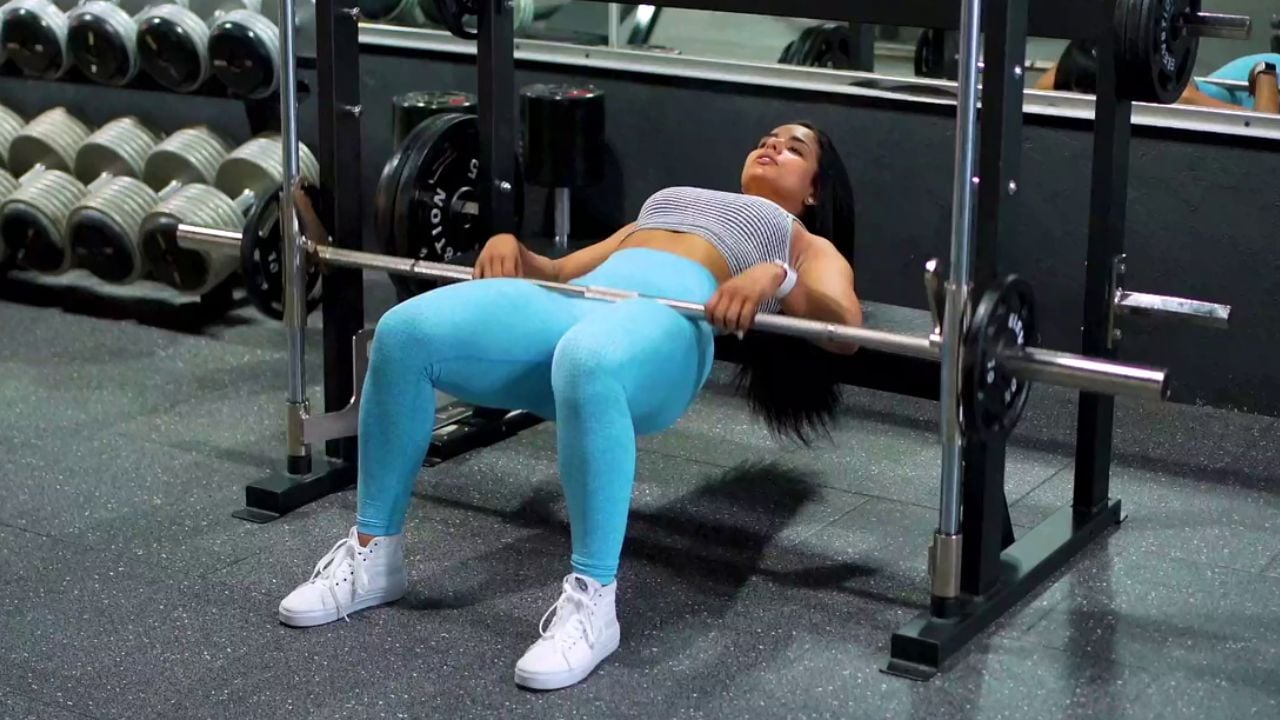
How to Do Hip Thrust on Smith Machine
A “sloppy” setup is the #1 reason people feel hip thrusts in their lower back instead of their glutes. Follow these technical specs for the perfect lift:
1. Setting Up Your Station
Use a standard weight bench, usually about 16 inches (ca. 41 cm) high. If the bench is too tall, you won’t be able to get a full range of motion. Secure the bench against the Smith Machine frame or a wall so it doesn’t slide backward.
The bench should be positioned so that when you lean against it, your upper back (just below your shoulder blades) will rest comfortably on its edge.
Lower the Smith machine bar to a height that allows you to comfortably slide underneath it and position it across your hips. Struggle.
2. Body Positioning
Your upper back should be resting against the bench as you sit on the ground. To create a stable base, your shoulder blades should be firmly placed on the bench. Bring your body forward until the padded bar touches your hip crease exactly.
Bend your knees and place your feet flat on the floor, hip-width apart. When your hips are fully extended at the top of the movement, your heels should be directly beneath your knees, creating a roughly 90-degree angle at the knee joint.
Try a few small changes; for some people, a slightly wider stance or slightly outward-pointing toes can improve glute activation.
3. The Vertical Shin Rule
This is the most important technical cue. When your hips are at the very top of the movement:
- Your shins must be vertical (90-degree angle to the floor).
- If your feet are too far out, you’ll feel it in your hamstrings.
- If your feet are too close to your butt, you’ll feel it in your quads.
4. Executing the Thrust
Brace your core, take a deep breath, and unrack the bar by pushing up slightly. Ensure the safety catches are disengaged.
Drive your hips up toward the ceiling while applying pressure to your heels. As you stretch your hips, concentrate on firmly contracting your glutes. At the peak of the exercise, your body should be in a straight line from your shoulders to your knees.
At the peak of the movement, consciously perform a slight posterior pelvic tilt (tucking your tailbone under slightly). This helps to maximize glute contraction, prevent hyperextension of the lower back, and ensure the glutes, not the lower back, are doing the work.
Exhale as you drive your hips upward (concentric phase) and inhale as you lower the weight (eccentric phase).
4. Adding Weight (If Applicable)
Once comfortable with the movement pattern, carefully add the desired weight plates to the Smith machine bar.
Always start with a lighter weight to perfect your form before increasing the load.
Tips and Form
- Place your feet shoulder-width apart, heels firmly planted on the ground.
- Your toes can slightly point outwards for stability.
- Maintain a neutral spine throughout the entire movement. Avoid arching or rounding your lower back.
- Ensure the pad or towel is securely positioned on the bar to prevent.
- At the starting position, initiate a slight posterior pelvic tilt (tucking your tailbone under slightly) to help engage your glutes.
- Experiment with different tempos (e.g., slow reps, paused reps at the top) to increase the challenge.
- Exhale as you drive upward, inhale as you lower the weight.
- Use a full range of motion: thighs should be parallel or below at the bottom.
- Don’t just rely on explosive reps. Try to slow down the lowering phase.
- Try different foot positions – toes pointed slightly more outward or closer together. These small tweaks can target your glutes in slightly different ways.
Smith Machine Hip Thrust Variations & Progressions
Once you’ve mastered the basic Smith Machine Hip Thrust, you can introduce variations to continually challenge your glutes, increase strength, and prevent plateaus.
These modifications allow for progressive overload and targeted muscle engagement.
1. Single-Leg Hip Thrusts
This advanced variation significantly increases the challenge to each glute individually, addressing muscular imbalances and enhancing unilateral strength.
To perform, simply lift one foot off the ground, focusing on driving through the heel of the working leg. This requires greater core stability and glute activation.
2. Elevated Foot Hip Thrusts
Place your feet on plates or a low, stable step, you increase the range of motion of the exercise.
Because of the deeper descent, the glutes can be stretched more at the bottom of the movement, which increases the amount of time under tension and may result in greater hypertrophy. Make sure your form is unaffected by the elevation and that it is stable.
3. Resistance Bands
An additional twist to the exercise can be added by looping a resistance band around your knees (and, depending on the length of the band, possibly anchoring it to the Smith Machine at a low point). Here’s how:
- The band will provide you with the greatest resistance as you reach the movement’s top.
- Bands work differently than regular weights, making them harder and possibly working your muscles differently.

Manish is a NASM-certified fitness and nutrition coach with over 10 years of experience in weight lifting and fat loss fitness coaching. He specializes in gym-based training and has a lot of knowledge about exercise, lifting technique, biomechanics, and more.
Through “Fit Life Regime,” he generously shares the insights he’s gained over a decade in the field. His goal is to equip others with the knowledge to start their own fitness journey.