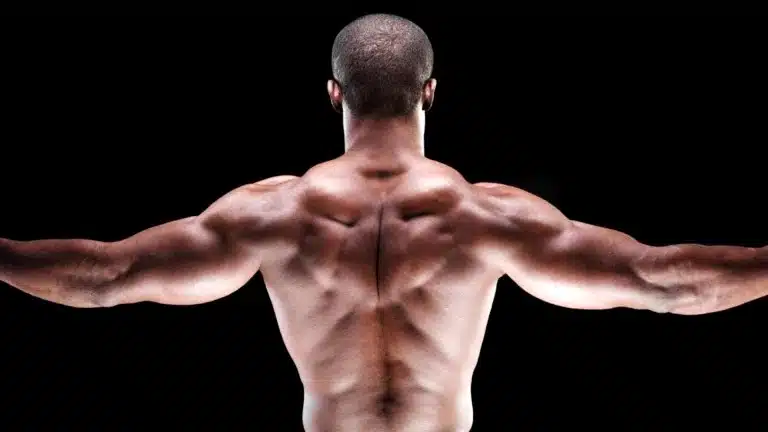
The stronger trap stabilizes and supports the neck, shoulders, and upper back. Weak traps can contribute to poor posture and rounded shoulders.
Strengthen these muscles, improve posture and reduce the risk of postural imbalances.
However, for some people, going to the gym to work on their trap may not always be feasible. Fortunately, various effective bodyweight trap exercises can be performed anywhere, anytime, without expensive gym equipment or memberships.
These exercises target the trapezius muscles and help to shape and tone the muscles, which makes your upper back and shoulders look better.
Let’s Dive In!
- Basic Anatomy of The Trapezius Muscles
- 10 Best Trap Exercises You Can Do At Home Without Equipment
- 1. Prone I, T, W,Y
- 2. Wall Slide
- 3. Bodyweight Shrugs
- 4. Plank T-Raises
- 5. Crab Walk
- 6. Bodyweight Plank Row
- 7. Inverted Row
- 8. Pull-Up
- 9. Shoulder Blade Squeeze
- 10. Upright Row
- Beginner At Home Trap Workout Routine
- Intermediate At-Home Trap Workout Plan
- Equipment You Can Use For Trap Exercises at Home
- Trap Exercises With Resistance Bands
- At-Home Trap Exercises With Dumbbells
- Trap Exercises With Barbell
- FAQs
- Can you build traps without weights?
- How often should I train my traps at home?
- Can trap exercises be done by beginners?
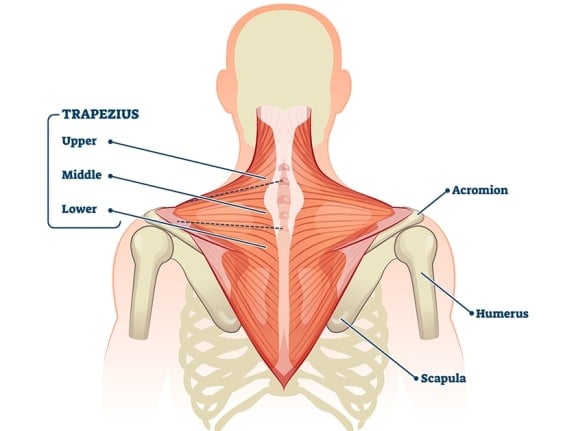
Basic Anatomy of The Trapezius Muscles
The trapezius muscles, commonly called the traps, are large muscles on the upper back and neck. The traps have a trapezoid shape, which is where their name originates.
The trapezius muscle is a broad, flat muscle that extends from the base of the skull to the lower thoracic vertebrae and laterally to the spine of the scapula.
The trapezius muscles are divided into three regions.
- The upper trapezius muscle elevates the shoulders and rotates them inward. They are worked primarily with shrugging movements.
- The middle trapezius muscle traps retract the scapula (shoulder blades). They are worked with rowing movements.
- The lower fibers of the trapezius muscle are responsible for depressing the scapula and rotating them upward. They are worked with exercises that involve raising the arms overhead.
10 Best Trap Exercises You Can Do At Home Without Equipment
Here are the 10 best trap exercises you can do at home with body weight to strengthen your upper, middle, and lower traps.
1. Prone I, T, W,Y
These exercises focus on the shoulder and back muscles, mainly the middle and lower part of the trapezius.
They also hit all the rotator cuff muscles, including the infraspinatus, subscapularis, teres minor, and supraspinatus muscles.
These work together to stabilize the shoulder and move the arm. It is essential to include these exercises in your trap workout regimen.
How To Do
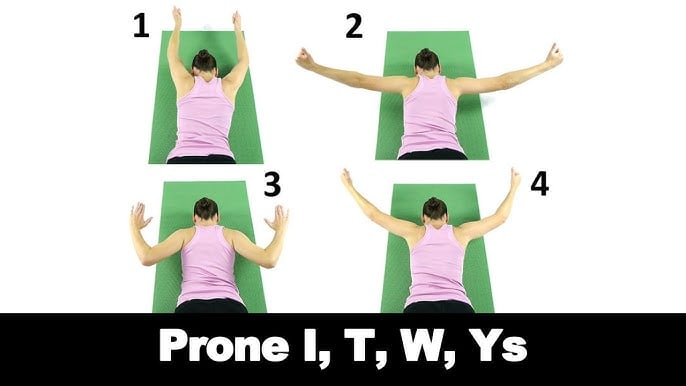
- Gently exhale and slowly lift your arms off the floor (maintain a formation of the letter “I, T, W,Y”), with palms facing inward.
- Keep your head aligned with your thoracic (upper) spine.
- Focus on using your shoulders to generate most of the lift, although some low back extension (arching) is acceptable.
Tips
- For the first time, try holding for only five or 10 seconds, and work up to 30 seconds in future workouts.
- Maintain your head alignment with your thoracic (upper) spine.
- Move your arms slowly up and down in each position of I, T, W and Y.
- Add a 1-3 pound weight in each hand to make the exercises more challenging.
- Do not hold your breath. Breathe regularly.
2. Wall Slide
Wall slides—also known as wall slides or wall angels—are one of the basic exercises that people are taught to practice for improved shoulder rotation, middle and upper trap activation, and scapular mobility.
Wall slides are an exercise that involves sliding your arms up and down along a wall while maintaining contact with it.
In the study, it was found that the group that did wall slide exercises had a significant decrease in pain in the rotator cuff muscles after four weeks.
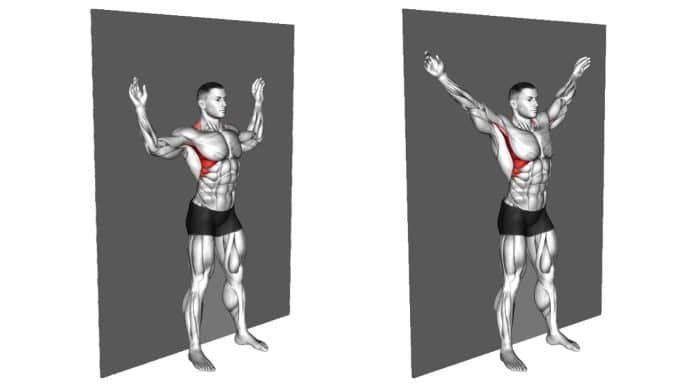
How To Do
- Start by standing with your back flat against a wall.
- Keep the back of your head, shoulders, butt, and heels against the wall.
- Slowly slide your arms up the wall, keeping your elbows straight until you reach a position where your arms are above your shoulders and at 90-degree angles from your torso.
- With your chest open and back tall, squeeze the muscles of your midback as you slide your arms down toward your shoulders.
- Keep your arms as close to the wall as possible as you slowly slide them down.
- Elbows are slightly lower than shoulder height.
- Hold this position for one count.
- Inhale and then push your arms back up to your starting position without lifting anything from the wall.
3. Bodyweight Shrugs
Bodyweight shrugs are a great way to work your traps without any equipment. It is one of the most common trap exercises that target the upper traps.
It requires lifting and lowering the shoulders in a controlled manner.
As you become more comfortable with bodyweight shrugs, you can add resistance by holding a heavy book or water bottle, light dumbbells, or utilizing resistance bands to further challenge the muscles.
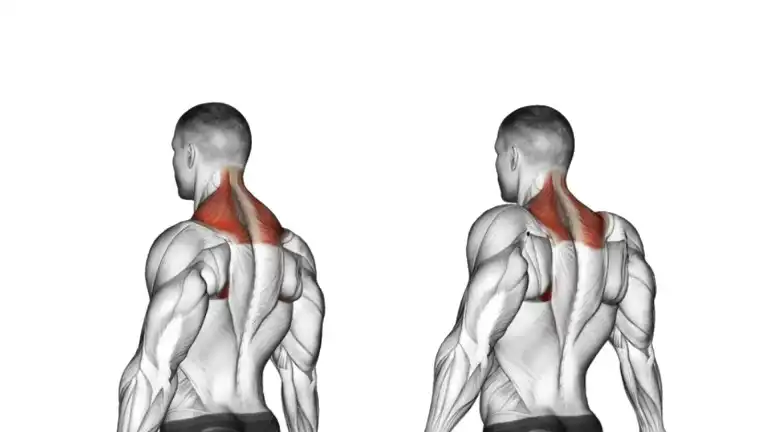
How to Do
- Stand upright with your feet shoulder-width apart.
- Let your arms relax by your sides. Keep your neck in a neutral position.
- Slowly lift your shoulders towards your ears as high as possible while keeping your arms relaxed.
- Hold the contracted position for a brief moment.
- Lower your shoulders back down to the starting position.
4. Plank T-Raises
Plank T-raises are a compound exercise that combines the stability challenge of a plank with the shoulder and upper back engagement of a T-raise.
It targets multiple muscle groups simultaneously, including the trapezius muscles, shoulders, core, and glutes.
Before attempting plank T-raises, ensure you have mastered a solid plank position, as this exercise builds upon the stability and strength of a traditional plank.

How To Do
- Start in a high plank position with your hands directly under your shoulders and your body forming a straight line from head to heels.
- Engage your core and glutes to maintain a stable plank position.
- Keep your hips and shoulders square to the ground and lift your other arm out to the side.
- Pause momentarily at the top, focusing on squeezing the shoulder blades together.
- Lower the arm back down to the starting position.
- Repeat the movement on the opposite side, alternating arms for the desired number of repetitions.
Know More: Plank Exercise: Benefits, Variations, Muscles Worked, Tips
5. Crab Walk
The Crab walk is an excellent bodyweight exercise that particularly works the upper arms, shoulders, trap, legs, and core.
It is excellent for toning, effectively targeting all your muscle groups and working them hard to build strength.
Moves like the crab walk are great total-body exercises that don’t require additional equipment, making them ideal moves to perform when you don’t have much time or fitness gear on hand.
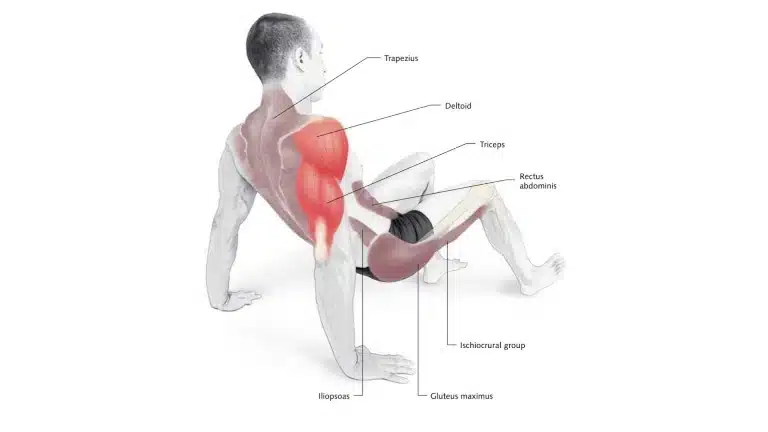
How To Do
- Position your hands and feet so that they are flat on the ground, and you are face up.
- Lift your butt up off the ground by tightening your gluteal muscles.
- Begin “walking” by first moving your hands and then your feet.
- To avoid excessive shoulder strain, move your hands no more than 6 to 8 inches (15 to 20 cm) at a time.
- As a caution, do not let your feet get moving too fast for your upper body so as not to injure your shoulders.
Know More: 21 Bodyweight Shoulder Exercises To Build Mass & Strength
6. Bodyweight Plank Row
Bodyweight plank rows, also known as renegade rows, are a compound exercise that combines the plank position with a rowing motion.
This exercise targets multiple muscle groups, including the back, shoulders, core, and arms.
If the exercise is challenging, you can do the rows in knee plank position until you have enough strength and stability.
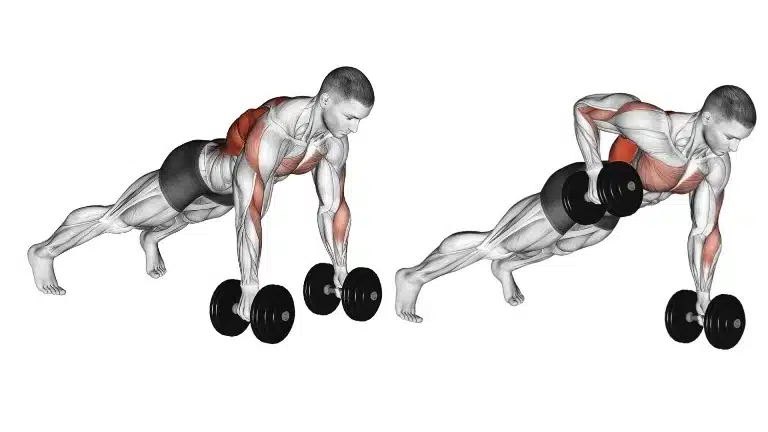
How to Do
- Start in a high plank position with your hands directly under your shoulders and your body forming a straight line from head to heels.
- Place your feet slightly wider than hip-width apart for stability.
- While maintaining a stable plank, engage your core and glutes.
- Shift your weight onto one arm and lift the opposite hand off the ground.
- Keep your elbow close to your body and pull the lifted arm upward until your hand reaches your ribs or slightly higher.
- Lower the arm back down to the starting position with control.
- Repeat the rowing motion on the opposite side.
- Alternate rows between each arm for the desired number of repetitions.
7. Inverted Row
The inverted row is another name for bodyweight rows. It puts your body in a horizontal position, making it easier to perform.
It also works the back and shoulder muscles including rhomboids, trap and rear delt from a different angle.
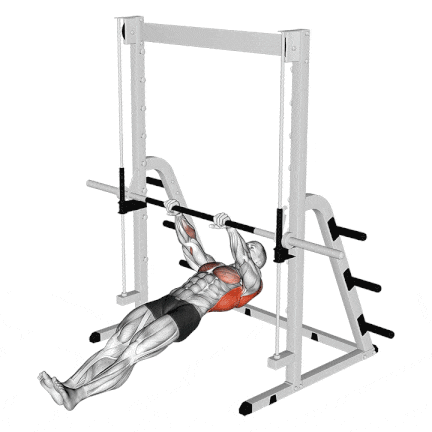
How To Do
- Adjust the height of the chair and bar so that it’s a little higher than arm’s length from the floor.
- Lie under the bar with your legs and body straight.
- Grasp the bar with an overhand grip that’s a little wider than shoulder width.
- Keeping your legs and body straight, exhale as you pull your chest up to the bar.
- Hold for a count of two and squeeze your back muscles.
- Inhale as you lower your body until your arms and shoulders are fully extended. Repeat.
8. Pull-Up
The pull-up is an upper-body strength movement that targets your back, shoulders, trap and arms.
Pull-ups are often a challenge for beginners and even experienced athletes to perform.
The pull-up increases the strength, thickness, and width of your back, specifically your lats. The lats influence back width and form the “V” in the upper back.
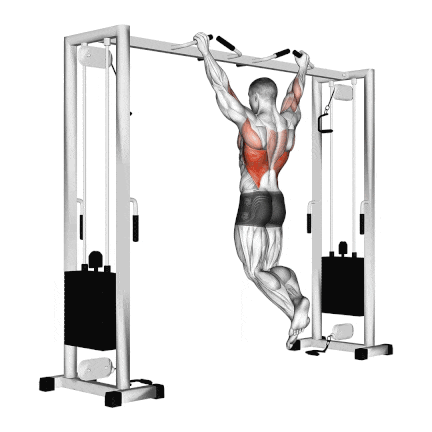
How To Do
- Using an overhand grip, grab a pull-up bar with your hands positioned at shoulder-width apart.
- Hang from the bar with your arms fully extended and your chest high, while exaggerating the arch in your lower back.
- Pull yourself up by squeezing your shoulder blades together and contracting your lats until your chin passes the bar.
- Hold the contraction at the top for a second before slowly lowering yourself back to the starting position.
Related Post: 25 Different Types Of Pull Ups And Chin Ups (Variations)
9. Shoulder Blade Squeeze
Shoulder blade squeeze, also known as scapular retraction or scapular squeeze, is an exercise that focuses on strengthening the muscles responsible for retracting the shoulder blades.
It primarily targets the upper back muscles, including the rhomboids and middle trapezius.
Shoulder blade squeeze helps prevent rounded shoulders and improve posture by strengthening the muscles that pull the shoulder blades back.

How to Do
- Start by sitting or standing upright with good posture.
- Relax your arms by your sides.
- Gently squeeze your shoulder blades together by retracting them towards your spine.
- Imagine pinching a pencil or holding a small object between your shoulder blades.
- Hold the squeeze for a few seconds while maintaining good posture.
- Relax and repeat the movement for the desired number of repetitions.
Read More: 10 Best Push Up For Beginner To Build Strong Upper Body
10. Upright Row
The upright row primarily targets the middle traps and the lateral deltoids. The exercise also engages the upper back muscles, including the rhomboids and rear delts.
The water bottle upright row is a modified version of the upright row exercise that involves using a water bottle filled with water or sand as a substitute for traditional weights or resistance.
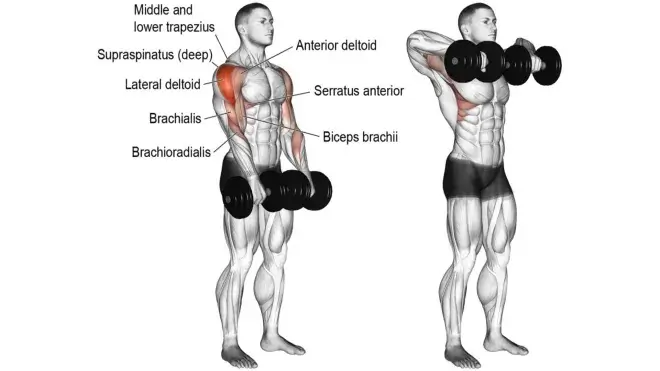
How to Do
- Stand with your feet shoulder-width apart, holding a water bottle in each hand.
- Begin with your arms fully extended, palms facing your body, and the water bottles hanging in front of your thighs.
- Engage your core and maintain good posture throughout the exercise.
- Slowly lift the water bottles by pulling them up towards your chin.
- Focus on squeezing your shoulder blades together as you perform the upward movement.
- Pause briefly at the top of the movement.
- Then, lower the water bottles back down to the starting position in a controlled manner.
Beginner At Home Trap Workout Routine
| Exercise | Sets | Reps | Rest |
|---|---|---|---|
| Bodyweight Shrugs | 3 | 12-15 | 60-90 sec |
| Prone Y Raise | 3 | 10-12 | 60-90 sec |
| Wall Slides | 3 | 12-15 | 60-90 sec |
| Shoulder Blade Squeeze | 3 | 10-12 | 60-90 sec |
| Upright Row | 3 | 8-10 | 60-90 sec |
Again, adjust the sets, reps, and rest periods based on your fitness level and capabilities
Intermediate At-Home Trap Workout Plan
| Exercise | Sets | Reps | Rest |
|---|---|---|---|
| Pike Push-Ups | 3 | 10-12 | 60 seconds |
| Prone T-Raises | 3 | 12-15 | 60 seconds |
| Bodyweight Shrugs | 3 | 12-15 | 60 seconds |
| Plank Rows | 3 | 8-10 | 60 seconds |
| Crab Walk | 2 | AMRAP | 60 seconds |
Equipment You Can Use For Trap Exercises at Home
You don’t need much equipment to perform trap exercises at home. Here are some tools and equipment that you can use.
Trap Exercises With Resistance Bands
Resistance bands are an excellent tool for performing trap exercises. They are affordable, portable, and versatile.
Here are some resistance bands trap exercises you can do at home.
- Resistance Band Pull-Apart
- Resistance Band Face Pulls
- Resistance Band Pull-Downs
- Resistance Band Shrug
- Band Upright Rows
- Band Bent-Over Rows
- Band Reverse Flyes
At-Home Trap Exercises With Dumbbells
Dumbbells are an essential piece of equipment for any home gym. They come in various weights and sizes and can be used for a variety of exercises.
Here are some dumbbell trap exercises you can do at home.
- Dumbbell Shrugs
- Dumbbell Upright Row
- Dumbbell Reverse Fly
- Dumbbell Bent-Over Rows
- Dumbbell Reverse Flyes
- Dumbbell Farmer’s Carries
- Dumbbell Y Raises
Trap Exercises With Barbell
The barbell is great for performing upright rows and other trap exercises. It is a bit pricier than resistance bands and dumbbells but worth the investment.
Here are some barbell band trap exercises you can do at home.
- Barbell Shrugs
- Barbell Upright Rows
- Barbell Bent-Over Rows
- Barbell Power Cleans
- Barbell Shoulder Press
- Barbell Farmer’s Carries
FAQs
Can you build traps without weights?
It’s possible to build up your traps at home with numerous bodyweight exercises, like bodyweight shrug, pike pushups, Y raises, , and wall slides.
How often should I train my traps at home?
The frequency of trap training is dependent on your objectives. The frequency of 1-2 times per week is sufficient.
Can trap exercises be done by beginners?
Yes, beginners can do trap exercises. It’s important to start with exercises that match your fitness level and work your way up as you get stronger and more comfortable.

Manish is a NASM-certified fitness and nutrition coach with over 10 years of experience in weight lifting and fat loss fitness coaching. He specializes in gym-based training and has a lot of knowledge about exercise, lifting technique, biomechanics, and more.
Through “Fit Life Regime,” he generously shares the insights he’s gained over a decade in the field. His goal is to equip others with the knowledge to start their own fitness journey.
I really love this page. Thanks
Welcome